
Are you interested in flash photography? Or do you prefer image editing? On March 21, from 9 PM to 11 PM CET, you don’t have to choose! That’s because in my new webinar Flash!Back, I take you through the story, the gear, the setup and the post-processing of some of my favorite flash photos. Through behind-the-scenes videos, photos or interactive 3D lighting setups, you can follow along and see how the RAW file was created. Then I show you how I apply the finishing touches with Lightroom, Photoshop or plug-ins. The 5 sample photos examples have been chosen in such a way that there is something for everyone: from small hotshoe flashes to heavier artillery and from one-click post-processing in Lightroom to more advanced finishes in Photoshop. The RRP for this webinar is US$ 24.95 (+ applicable taxes, if any), but until March 15, you can register at the early-bird rate of only US$ 14.95. Can't watch live? That's no problem, because every participant also receives a replay link so that you can rewatch the webinar to your heart’s content!
How to add a spotlight effect with Lightroom Classic's new masks
in Lightroom
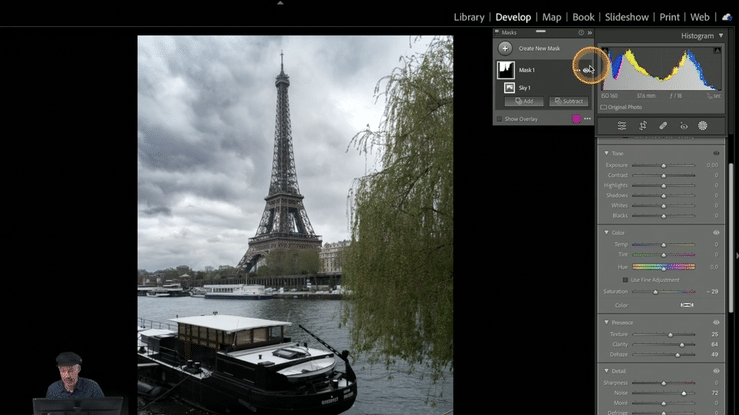
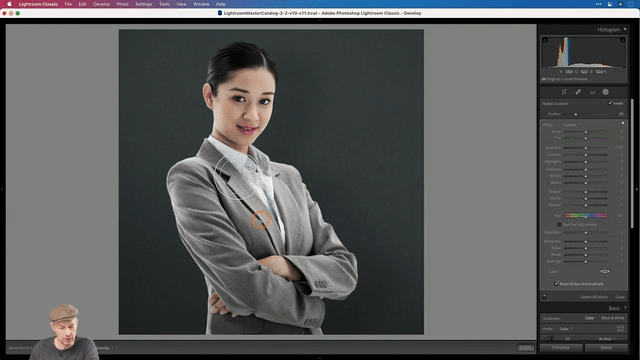
The examples I’ve shown so far of the new masking tools in Lightroom Classic were interesting enough (check the previous blog posts if you missed them), but they still fell in the category of regular image editing. But the new masks are so powerful, that you can also use them to go beyond ‘corrective’ editing and move into ‘creative editing’, something that would normally require Photoshop. In the video below, I’ll add a spotlight effect behind the model.
Do you want to know more everything about the new masks in Lightroom Classsic?
As you could see in the video, the new masks are nothing short of amazing. In fact, they’re so game-changing that I’m doing a two part live webinar about them, featuring dozens of practical case studies. These case studies cover all kinds of photography: landscape, portrait, studio, product, real estate, … If you’re halfway serious about Lightroom Classic, you really should not miss this two part training. I already held the same training in Dutch for my Belgian and Dutch audience and it was my best (and most visited) webinar of 2021!
The English webinar will be on February 7 and 9, from 9 to 11 PM CET. But if you can’t make it to one or even both live sessions, don’t worry because each participant will also receive streaming AND downloadable access to the recordings! Plus, if you book at the early-bird rate, you’ll also receive a set of 10 masking presets (some people would charge the early bird price for just those presets alone!).
(Early bird price of US$29.95 + taxes, if and when applicable, valid until February 1)
Other Lightroom-related posts:


The new Lightroom Masks: not only for people portraits!
in Lightroom
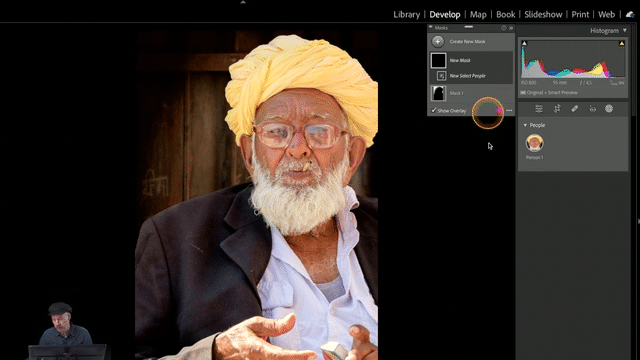
In the previous blog post, you saw me brighten only the face in a portrait without ever having to resort to complex brushing. Such is the power of the new masking tools in Lightroom Classic, especially when you start to combine them using the Invert, Add, Subtract and Intersect options. In this new video, I show you how you can apply exactly the same technique to other types of photography, like wildlife.
Do you want to know more everything about the new masks in Lightroom Classsic?
As you could see in the video, the new masks are nothing short of amazing. In fact, they’re so game-changing that I’m doing a two part live webinar about them, featuring dozens of practical case studies. These case studies cover all kinds of photography: landscape, portrait, studio, product, real estate, … If you’re halfway serious about Lightroom Classic, you really should not miss this two part training. I already held the same training in Dutch for my Belgian and Dutch audience and it was my best (and most visited) webinar of 2021!
The English webinar will be on February 7 and 9, from 9 to 11 PM CET. But if you can’t make it to one or even both live sessions, don’t worry because each participant will also receive streaming AND downloadable access to the recordings! Plus, if you book at the early-bird rate, you’ll also receive a set of 10 masking presets (some people would charge the early bird price for just those presets alone!).
(Early bird price of US$29.95 + taxes, if and when applicable, valid until February 1)
Other Lightroom-related posts:

How to brighten only a face with Lightroom Classic's new Masking tools
in Lightroom
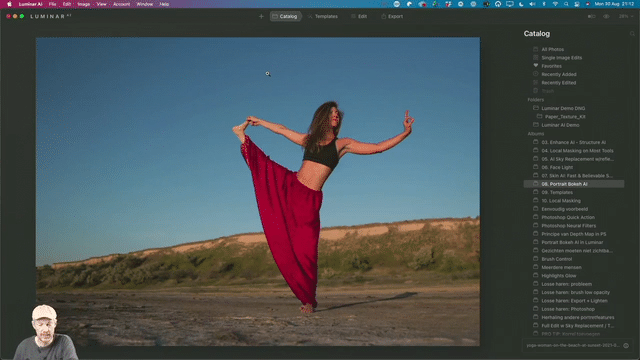
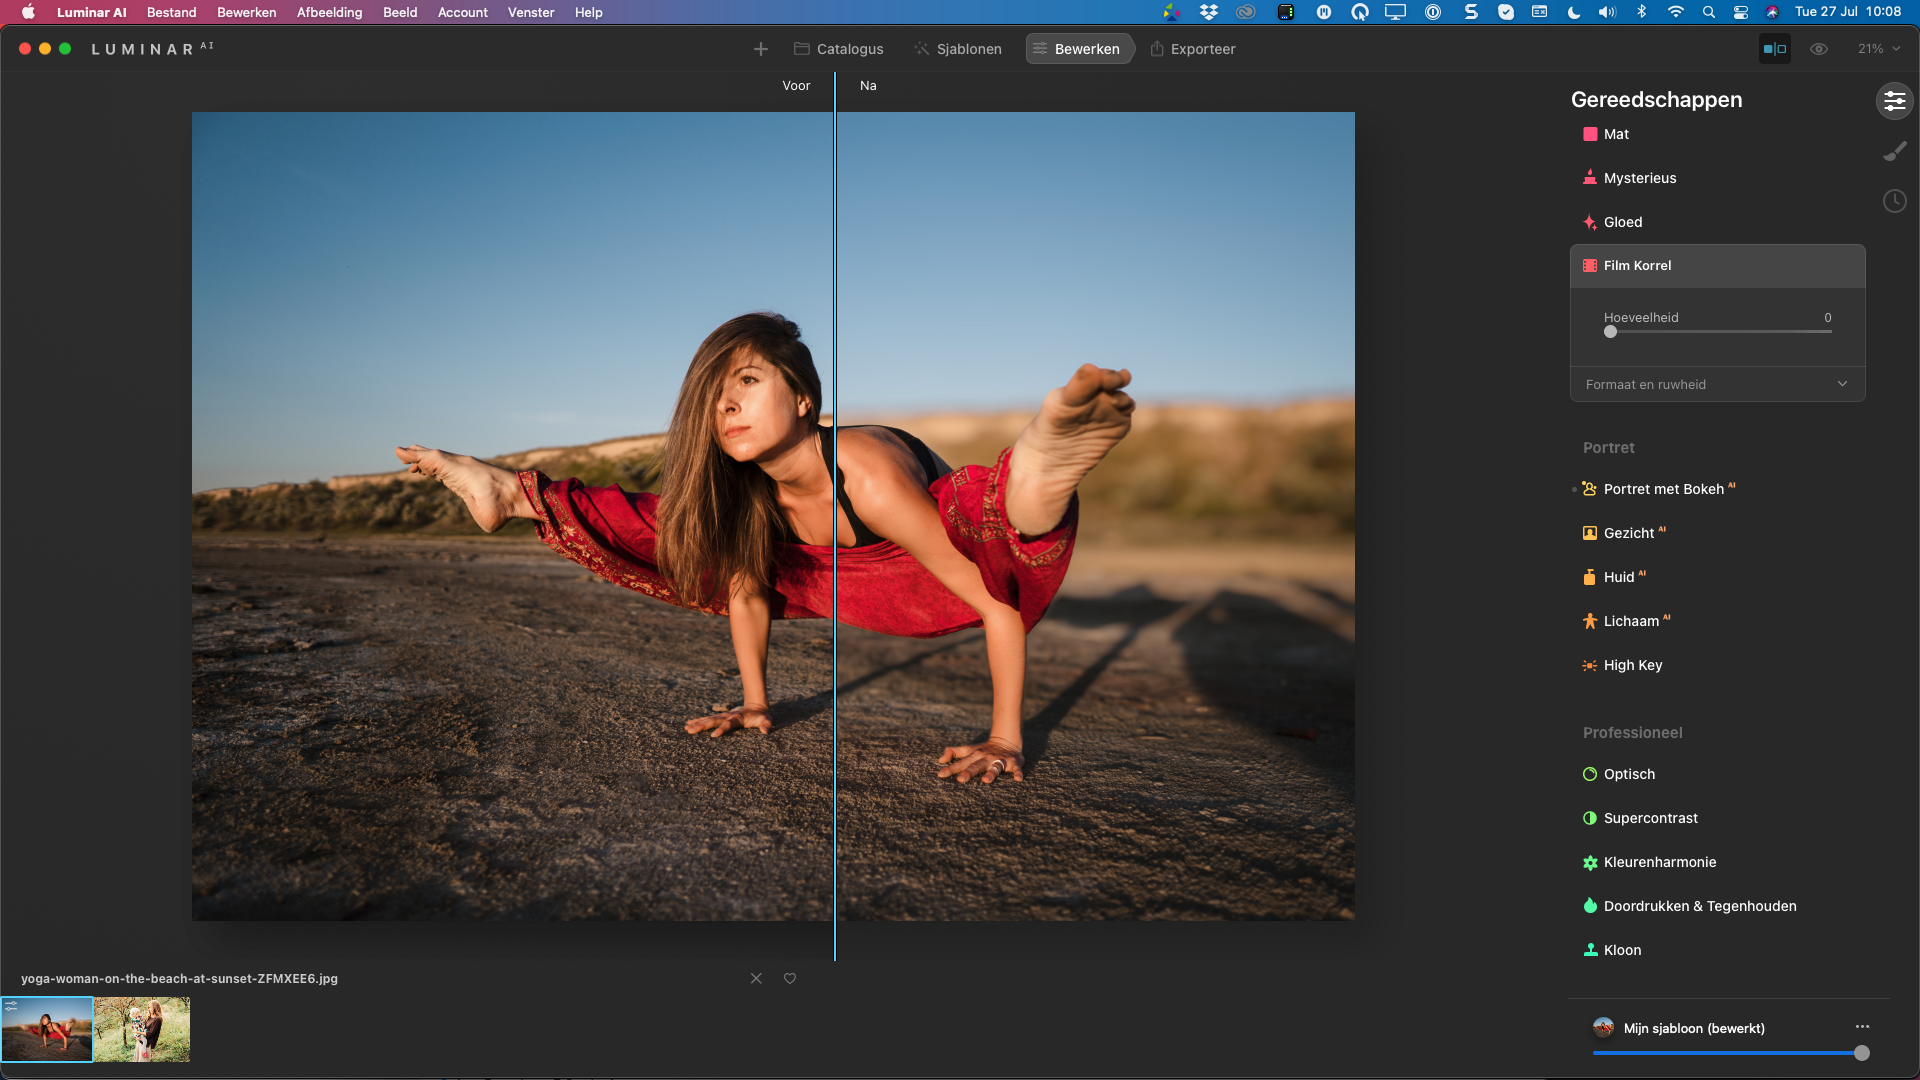
If you follow this blog, you probably know one of my favourite plug-ins for Lightroom is Luminar AI. And one of the reasons that it’s one of my favourites, is the Face Light tool, that lets you automatically brighten faces in images, without having to make a single selection, let alone paint anything.
With the new masks in Lightroom Classic, you can do something similar, straight within Lightroom. It’s not 100% automated as in Luminar AI, but the two simple steps it takes are easily performed in the time it would otherwise take you to open the image in Luminar AI. Let me show you how in the video below.
Do you want to know more everything about the new masks in Lightroom Classsic?
As you could see in the video, the new masks are nothing short of amazing. In fact, they’re so game-changing that I’m doing a two part live webinar about them, featuring more than 50 practical case studies. These case studies cover all kinds of photography: landscape, portrait, studio, product, real estate, … If you’re halfway serious about Lightroom Classic, you really should not miss this two part training. I already held the same training in Dutch for my Belgian and Dutch audience and it was my best (and most visited) webinar of 2021!
The English webinar will be on February 7 and 9, from 9 to 11 PM CET. But if you can’t make it to one or even both live sessions, don’t worry because each participant will also receive streaming AND downloadable access to the recordings! Plus, if you book at the early-bird rate, you’ll also receive a set of 10 masking presets (some people would charge the early bird price for just those presets alone!).
(Early bird price of US$29.95 + taxes, if and when applicable, valid until February 1)
Other Lightroom-related posts
Editing group shots with Lightroom Classic's new Masking tools
in Lightroom
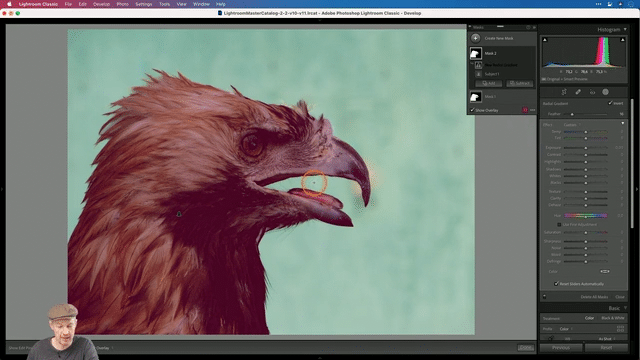
In this second in a series of tutorial videos about the completely revamped masks in Lightroom Classic, I’ll show you how you can edit specific people in a group shot: you use Select Subject to have Lightroom Classic do the heavy lifting, and then tweak your selection with any of the 7 remaining tools.
Do you want to know more everything about the new masks in Lightroom Classsic?
As you could see in the video, the new masks are nothing short of amazing. In fact, they’re so game-changing that I’m doing a two part live webinar about them, featuring more than 50 practical case studies. These case studies cover all kinds of photography: landscape, portrait, studio, product, real estate, … If you’re halfway serious about Lightroom Classic, you really should not miss this two part training. I already held the same training in Dutch for my Belgian and Dutch audience and it was my best (and most visited) webinar of 2021!
The English webinar will be on February 7 and 9, from 9 to 11 PM CET. But if you can’t make it to one or even both live sessions, don’t worry because each participant will also receive streaming AND downloadable access to the recordings! Plus, if you book at the early-bird rate, you’ll also receive a set of 10 masking presets (some people would charge the early bird price for just those presets alone!).
(Early bird price of US$29.95 + taxes, if and when applicable, valid until February 1)
Featured
Re-edit old images with new tools
in Lightroom
What do you do when lockdowns and strict travel restrictions are wreaking havoc on your travel and photography plans? Well, one thing you can do is to take a trip through your photo archive and re-edit your old photos with the latest tools and knowledge that you've acquired over the past years.
In this video, I re-edit a 12 year old black and white conversion. In my new edit, I make ample use of the new local adjustments that were introduced in Lightroom Classic at the end of 2021.
Do you want to know more everything about the new masks in Lightroom Classsic?
As you could see in the video, the new masks are nothing short of amazing. In fact, they’re so game-changing that I’m doing a two part live webinar about them, featuring more than 50 practical case studies. These case studies cover all kinds of photography: landscape, portrait, studio, product, real estate, … If you’re halfway serious about Lightroom Classic, you really should not miss this two part training. I already held the same training in Dutch for my Belgian and Dutch audience and it was my best (and most visited) webinar of 2021!
The English webinar will be on February 7 and 9, from 9 to 11 PM CET. But if you can’t make it to one or even both live sessions, don’t worry because each participant will also receive streaming AND downloadable access to the recordings! Plus, if you book at the early-bird rate, you’ll also receive a set of 10 masking presets (some people would charge the early bird price for just those presets alone!).
(Early bird price of US$29.95 + taxes, if and when applicable, valid until February 1)
Other Lightroom-related posts:
Luminosity Masking made Easy
With less than 24 hours to go until this year's 5DayDeal comes to a close, I wanted to share a quick video with you about one of my own discoveries in this year's 5DayDeal bundle: Luminosity Masks. I know what they are, but I never used them all that much and when I did, I used a simple set of Photoshop actions that I made 10 years ago.
But... that's the beauty of the 5DayDeal: you buy them for a specific set of courses or tools that you're really interested in (in my case mostly portrait photography related stuff) but you get all the other goodies, too. And there's some real hidden gems in there. For me, the Luminosity Masking panel Lumenzia is a real revelation. I did a little video about it, which you can watch below. I apologize for the bad image quaity, but with it being past midnight already I could not re-record it. I can assure you the video quality of the actual 5DayDeal courses is top-notch, though :-)
Why you should NOT buy my new course...
If you’ve been following this blog, you probably know I’m a big fan of Luminar AI. It’s one of my favourite plug-ins for Lightroom and Photoshop, but it also holds up nicely as a Lightroom alternative for those who’d prefer to use it that way.
I spent the last couple of weeks working on a brand new, in-depth video course on Luminar AI. It’s called Luminar AI Magic and it will be available on my website for $99 starting next week.
Yet, I recommend you don’t buy it!
At least… not next week. If you’re interested in the course, I have a way for you to not only get it sooner, but also cheaper because it’s one of the launch exclusive courses included in the 5DayDeal bundle. Not only will you save $10 – the bundle’s only $89 – but you’ll get over $2000 worth of other courses and tools as well, by industry leaders such as Scott Kelby, Greg Benz and Serge Ramelli. You can find the entire list of what’s included here. For example, there’s a great pack of sky textures by Serge Ramelli, that works brilliantly with Luminar AI’s Sky Replacement tool.
As a sampler, here’s one of the chapters from the course. The total course is five hours and the total running time of all the courses in the 5DayDeal Main Bundle is over 33 hours!
New AI masking tools coming to Lightroom Classic: my first hands-on impressions
in Lightroom
I was lucky enough to be able to play with the new Masking feature that is coming to the next update of Lightroom Classic, Lightroom and Camera Raw. I don’t like to use the word ‘game-changer’ because it’s heavily overused, but this update really is… a game-changer. Find out why in the video below…
Other Lightroom articles on the blog:


Luminar Neo - Great news!
Skylum just announced more details about Luminar Neo, and in addition to many examples of before-and-afters, it also includes good news for existing users of Luminar 4 and Luminar AI. Let's start with that!
Luminar 4 and AI Catalogs will be able to be migrated to Luminar Neo!
Some of the long-term Luminar users complained – rightly so I think – about the fact that Luminar Neo introduced yet another catalog format that was not compatible with the catalog of Luminar 4 or Luminar AI. Now, if you are using Luminar as a plug-in, the catalog format doesn't really matter to you but if you use Luminar as a stand-alone application, like a lot of you do, then it's annoying to say the least that with every new product you either have to start from scratch or resort to convoluted workarounds like exporting all of your edited images from the old version and importing them into the new one.
So, the good news is that Skylum has announced that they will provide a migration tool to migrate Luminar 4 and Luminar AI catalogs to Luminar Neo. It's important to underline that it won't be available right from the start's but it's been officially added to the roadmap for a future update of Luminar Neo. And I think that's excellent news and it's also proof that sky them listens to their customers. Meer info over de verwachte mogelijkheden van Luminar Neo
Now, the other good news is that Skylum released some more insight on what Luminar Neo will be able to do. I was also invited to an online meeting with the Skylum management last Friday and we got to see and hear some of the features that are going to be included in Luminar AI either right from the start or in one of the early updates. And I have to say I was quite impressed.
I can't reveal everything yet, but here are a couple of things that we can share already.
The return of Layers!

Layers are back in Luminar Neo
First of all I'm very excited that Layers will be back. I loved the layers in Luminar 4, and although Luminar AI’s masking brush does allow some form of working with layers, it was more limited than the options Luminar 4 provided. So, it's good to hear that layers will be coming back to Luminar Neo, including the option to use raw images and the fact that you will have control over blending modes, masking and opacity to create things like collages, or double exposure affects. Luminar Neo will also come with a library of overlay contents and objects that you can play around with.
Relight AI: relight your images after the fact!

Another feature that I am maybe even more enthusiastic about is Relight AI. Relight AI uses the concept of 3D depth mapping that Luminar AI already uses in Atmosphere AI and Portrait Bokeh AI. 3D Depth Mapping identifies the different planes in an image like the foreground, the middle ground and background and on top of that also identifies objects like people or skies. All that information can then be used to realistically add mist or haze in the case of Atmosphere AI or realistic shallow depth of field in the case of Portrait Bokeh AI. And now, in Relight AI, that 3D depth map will give you separate control over the foreground and the background lighting of an image. Without making a selection, it will be possible to brighten up the subject or tone down a background or even both.

No more making complicated selections yourself. Relight AI allows you to better match under- or over-exposed foregrounds or backgrounds!
I think this will be a tremendous time saver in my own photography because, although I already use flash to balance my foreground and my background as much as possible in-camera, I sometimes find I need to brighten my subject even more in post because my flash wasn't powerful enough. And although I can already do that to some degree in Luminar AI with the Face Light slider, Relight AI will give me a lot more control.
Portrait Background Removal AI
In one of my latest webinars, I said that it wouldn't surprise me that Skylum would use the masks its software is able to create on other tools beside Portrait Bokeh AI and this next feature proves me right: with Portrait Background Removal AI, you will be able to eliminate the most tedious step in making composites, which is masking your subject.
Portrait Background Removal AI will, as its name implies, initially focus on portraiture but other uses of the technology are being considered.
Mask AI: great masks without the work or the wait

Mask AI can automatically create masks for key elements of your photo, so that you can intervene locally on those parts: for example, sharpen locally, saturate more or less, apply extra contrast and so on!
As you can see, a lot of Luminar Neo’s core functionality revolves around the complex masks that the software builds under the hood. What I really love is that as a user, we will now get to use those masks even more in the new Mask AI. Mask AI will include masks for portraits, skies, water, mountains, vegetation, and man-made objects such as architecture and will work brilliantly in conjunction with Luminar Neo’s other tools. Suppose you want to increase the saturation in the forest of an image, just apply the desired tool to your image and then restrict its effects by choosing the Vegetation mask. Mask AI will allow you to add effects to your images locally, without having to worry about making complex masks.

Add some 'Golden Light', but only on the mountain range? No problem: Mask AI has already nicely selected it for you.
A new engine
Now a lot of you have asked: ‘Why couldn't Skylum simply include these new features as an update to Luminar AI instead of releasing a new product?’ Well, first of all, I think a big part of the update versus new product debate has become kind of moot because of the catalog translation tool that I talked about at the beginning of this video. But secondly, during the meeting that I was in, it was emphasized that these technologies are so advanced, and also resource-intensive that they simply could not be integrated into the Luminar AI engine. It's like expecting a nice family car to run a formula 1 race. It just can't do it with the engine it has and the same goes for Luminar.
We have to bear in mind that we are on the cutting-edge of AI-driven image editing here and that frankly, Skylum has made possible some pretty advanced things like sky replacement, even in water reflections, that no one else is doing right now. So, if Skylum’s co-founder and Chief Technical Officer tells me that they simply couldn't include all the cool features I just talked about, in luminary AI, then who am I to know better. I'm not a programmer, I'm a photographer and an image editor but I'm sure happy that the programmers are going out of their way to make my editing life more fun and less repetitive and tedious.
Luminar AI is still available!
And also, let's not forget that Luminar AI is continuing to be sold, as it and Luminar Neo are aimed at different types of photographers. So, just like family members, they share some DNA, but they’re still different and they co-exist, very much as we see with other developers of image editing software, where advanced and more easy-to-use versions of products exist.
Smart Edit History
Luminar Neo's new engine will include a smart edit history that will provide unlimited levels of undo for every image and will allow users to selectively remove and reorder the application of tools and effects. On the other hand, by already rendering changes as the edits progresses, the final export of your edited image will be faster.
When can we expect all this? And is everything delivered at once? And… what’s the price?
Luminar Neo will ship this winter with Layers and Relight AI included. Portrait Background Removal AI and Mask AI are scheduled to be included in the first free update which should be released in the first quarter of 2022.
If you're interested, you can still participate in the early bird campaign and get Luminar Neo at the following prices. You can use the links below or in the top right corner to order using my affiliate link. It doesn’t cost you anything extra and it helps me to keep this channel up and running.
New users:
1 computer license for Luminar Neo: 65 $/€
license for 2 computers for Luminar Neo: 76 $/€
If you don't want to wait that long, you can buy a discounted bundle of Luminar AI + Luminar Neo and start playing with AI right now!
1 computer license for Luminar AI + Neo: 94 $/€
license for 2 computers for Luminar AI + Neo: 115 $/€
Existing users:
If you're an existing Luminar user, Skylum offers a loyalty discount and you can pre-order – for a limited time – at these prices.
1 computer license for Luminar Neo: 44 $/€
license for 2 computers for Luminar Neo: 59 $/€
1 computer license for Luminar AI + Neo: $73/€
license for 2 computers for Luminar AI + Neo: 98 $/€
Don't forget that Luminar Neo comes with a 30 day no-questions-asked money back guarantee that only starts to count from the moment it is effectively shipped.
That was it for this information update about Luminar Neo. Thanks for reading and see you next time!


Photoshop-tip: Adding cinematic color contrast to your images
in Photoshop
Adding cinematic color contrast to your photos (usually a warm subject and a cooler background) is a classic way to literally and figuratively enhance your subject. Many movies and television series also work according to that principle. In photography, you can already do this ‘in-camera’ by, for example, lighting your subject with a warmer-than-standard continuous light or by placing a warm color filter on your flash. But what if you only think about it after your shoot, or you want to enhance an existing effect? Then this less-than-three-minute Photoshop tip may come in handy!
Want to learn more about Photoshop? Then my course ‘Photoshop for Lightroom Users' is undoubtedly something for you. Find out more about it here.
Meet Luminar Neo

Exciting news! two days ago, I was on a briefing with the management of Skylum, the company behind one of my favourite plug-ins: Luminar AI. And guess what: the Luminar family is expanding! Towards the end of the year, Skylum will release Luminar Neo.
Luminar Neo is not an upgrade to Luminar AI. It will be a different product that will have a lot of the features and tools of Luminar AI, but at the same time, it will also bring back some of the tools that Luminar 4 users loved, like more advanced layers! So, if anything, Luminar Neo is more like an upgrade of Luminar 4 than of Luminar AI.
Here’s a couple of things that you can expect from Luminar Neo:
AI-Driven Compositing
Smart, AI-based masking easily isolates elements in individual images.
Add numerous images as layers to create entirely new art.
Apply any tool and any mask ... to any layer, in any order, multiple times.
Use creative blending modes, guided by AI, to achieve clean, precise, composite images.
Improved Ease of Use
Users can save their photos as well as presets for easy reuse.
All editing steps remain editable for complete control over the final image.
With a minimalist user interface, the whole process is enjoyable and easy.
So, if you’re thinking: this looks like a more ‘pro’ version of Luminar AI, that’s also how I would describe it. If you’re happy with what Luminar AI currently offers, then Luminar Neo probably won’t be for you and you can happily continue to use Luminar AI. However, if the current features in Luminar AI have made you think ‘I wonder what more AI could bring to creative image editing’, then Luminar Neo will be certainly be right up your alley. I, for one, am constantly wishing that I could use the Sky AI masks and the Portrait Bokeh AI masks for other purposes. Well, Luminar Neo will let me!
I wish I could tell you more, but that’s about all I know myself. As soon as I can, I will share more news and as winter is coming (which reminds me I still have to watch Game of Thrones), hopefully I’ll be able to show some sneak previews of the interface. In the mean time, here’s a couple of FAQ’s
Luminar Neo and Luminar AI: FAQs
Q: Will Luminar Neo be subscription software?
A: No, it will be a traditional license, just like Luminar AI: buy it once and use the version you bought forever (or at least as long as your computer and operating system allow.
Q: Do I need both Luminar AI and Luminar Neo?
A: That will be up to you! Luminar Neo will offer more tools and more controls than Luminar AI.
Q: Will my Luminar AI templates work in Luminar Neo
A: There will be a translation tool to make sure that AI templates will work in Neo. Neo will have a preset system of its own, that will be even more powerful than Luminar AI’s.
Q: Does this mean that Luminar AI is ‘dead’?
A: Unlike Luminar 4, which is now officially discontinued and retired from the Skylum store, Luminar AI is still available for purchase, as it is aimed at a different type of user. Luminar AI already received 4 free updates, that brought (even more than) all the features that were promised when it was announced. So, unlike Luminar 4, Luminar AI is currently not ‘End of Life’, in software terms. I am even in the process of scripting and recording ‘The Ultimate Guide to Luminar AI’, an in-depth video course for it, that I’m hoping to have ready by mid-October. It is currently unclear whether, other than support for new cameras, Luminar AI will receive additional features. If you’re excited by the prospect of even more AI-driven features, then you should probably add Luminar Neo to your toolkit, in addition to Luminar AI.
Q: Why can’t Skylum simply do an upgrade of Luminar AI?
A: Luminar AI has been conceived as a tool that was both simple to use yet under the hood managed to do incredibly complex tasks, driven by AI. The latest update, Portrait Bokeh AI, is a great example of that. To do the same thing in Photoshop takes years of Photoshop experience and tens of minutes of work, often with inferior results. The vocation of Luminar Neo goes beyond that, and as such, it would be impossible to marry Luminar AI’s ease of use with Luminar Neo’s bigger toolset. Also, because of the complexity of some of the tools that Skylum is planning on incorporating in Luminar Neo, the underlying technological engine had to be rebuilt.
Q: I just bought Luminar AI, but from what I hear, it sounds like Luminar Neo might be more my cup of tea.
A: Good news: Skylum’s got your back! Although they’re different products aimed at different types of creatives, everybody who bought Luminar AI between July 27 and September 8, will receive a free license for Luminar Neo when it is released.
Q: I’m an existing user of Luminar AI and it looks like I might want to add Luminar Neo to my workflow. Is there an early bird or a loyalty bonus?
A: There certainly is. In fact there’s both of them: as an existing Luminar 4 or AI user, you’ll be able to pre-order Luminar Neo between now and September 19 at the lowest possible price. (Offer limited tot the first 30.000 customers)
1-seat license for Luminar Neo: 34 $/€
2-seats license for Luminar Neo: 49 $/€
1-seat license for Luminar AI+Neo: 63 $/€
2-seats license for Luminar AI+Neo: 88 $/€
And the best thing is: you’re backed by Skylum’s 30 day money back guarantee, that only starts when Luminar Neo actually ships! So, you can lock in the best rate, you will be among the first to receive Neo and you’ll still be able to get a refund in case it’s not what you hoped (although chances are small, I think!)
Q: I’m not currently using Luminar, but Luminar Neo sounds promising. How much will it cost?
A: the final pricing has yet to be determined, but it’s going to go up as we get nearer the launch date. As a new user, you can buy into luminar Neo for its lowest possible price right now, and be among the first who receive the software. And you’re still backed by the 30 day money back guarantee that only starts when the product is delivered. So… no risk and maximum savings.
1-seat license for Luminar Neo: 54 $/€
2-seats license for Luminar Neo: 59 $/€
If you can’t wait that long, you can buy a discounted bundle of Luminar AI + Luminar Neo and already start to play with AI right now!
1-seat license for Luminar AI+Neo: 83 $/€
2-seats license for Luminar AI+Neo: 98 $/€

THE GFX 50S Mark II
A larger-than-fullframe camera for larger-than-life images.
The Fujifilm GFX 50S Mark II: First Impressions
Disclaimer: I am a Fujifilm X-Photographer. I have been using Fujifilm GFX cameras for the past five years. So, is this review biased? Probably. But then again, very few reviews aren’t. What might be more important for you to know is that, contrary to popular belief, Fujifilm X-Photographer don’t get free GFX cameras and lenses thrown at them – at least I don’t :-) So, I have personally invested a lot of money in my own GFX system and I wouldn’t have done so if I didn’t truly believe it’s a great camera system for me. I hope this review can shed some light as to whether it can also be for you. And while we’re on the subject of disclaimers: the images in this article are not ‘Straight-Out-Of-Camera'. I like editing my images. In fact, the ‘postprocessability’ – did I just invent a new word? – of the GFX files is one of the reasons I love them so much.
How my GFX love affair started…
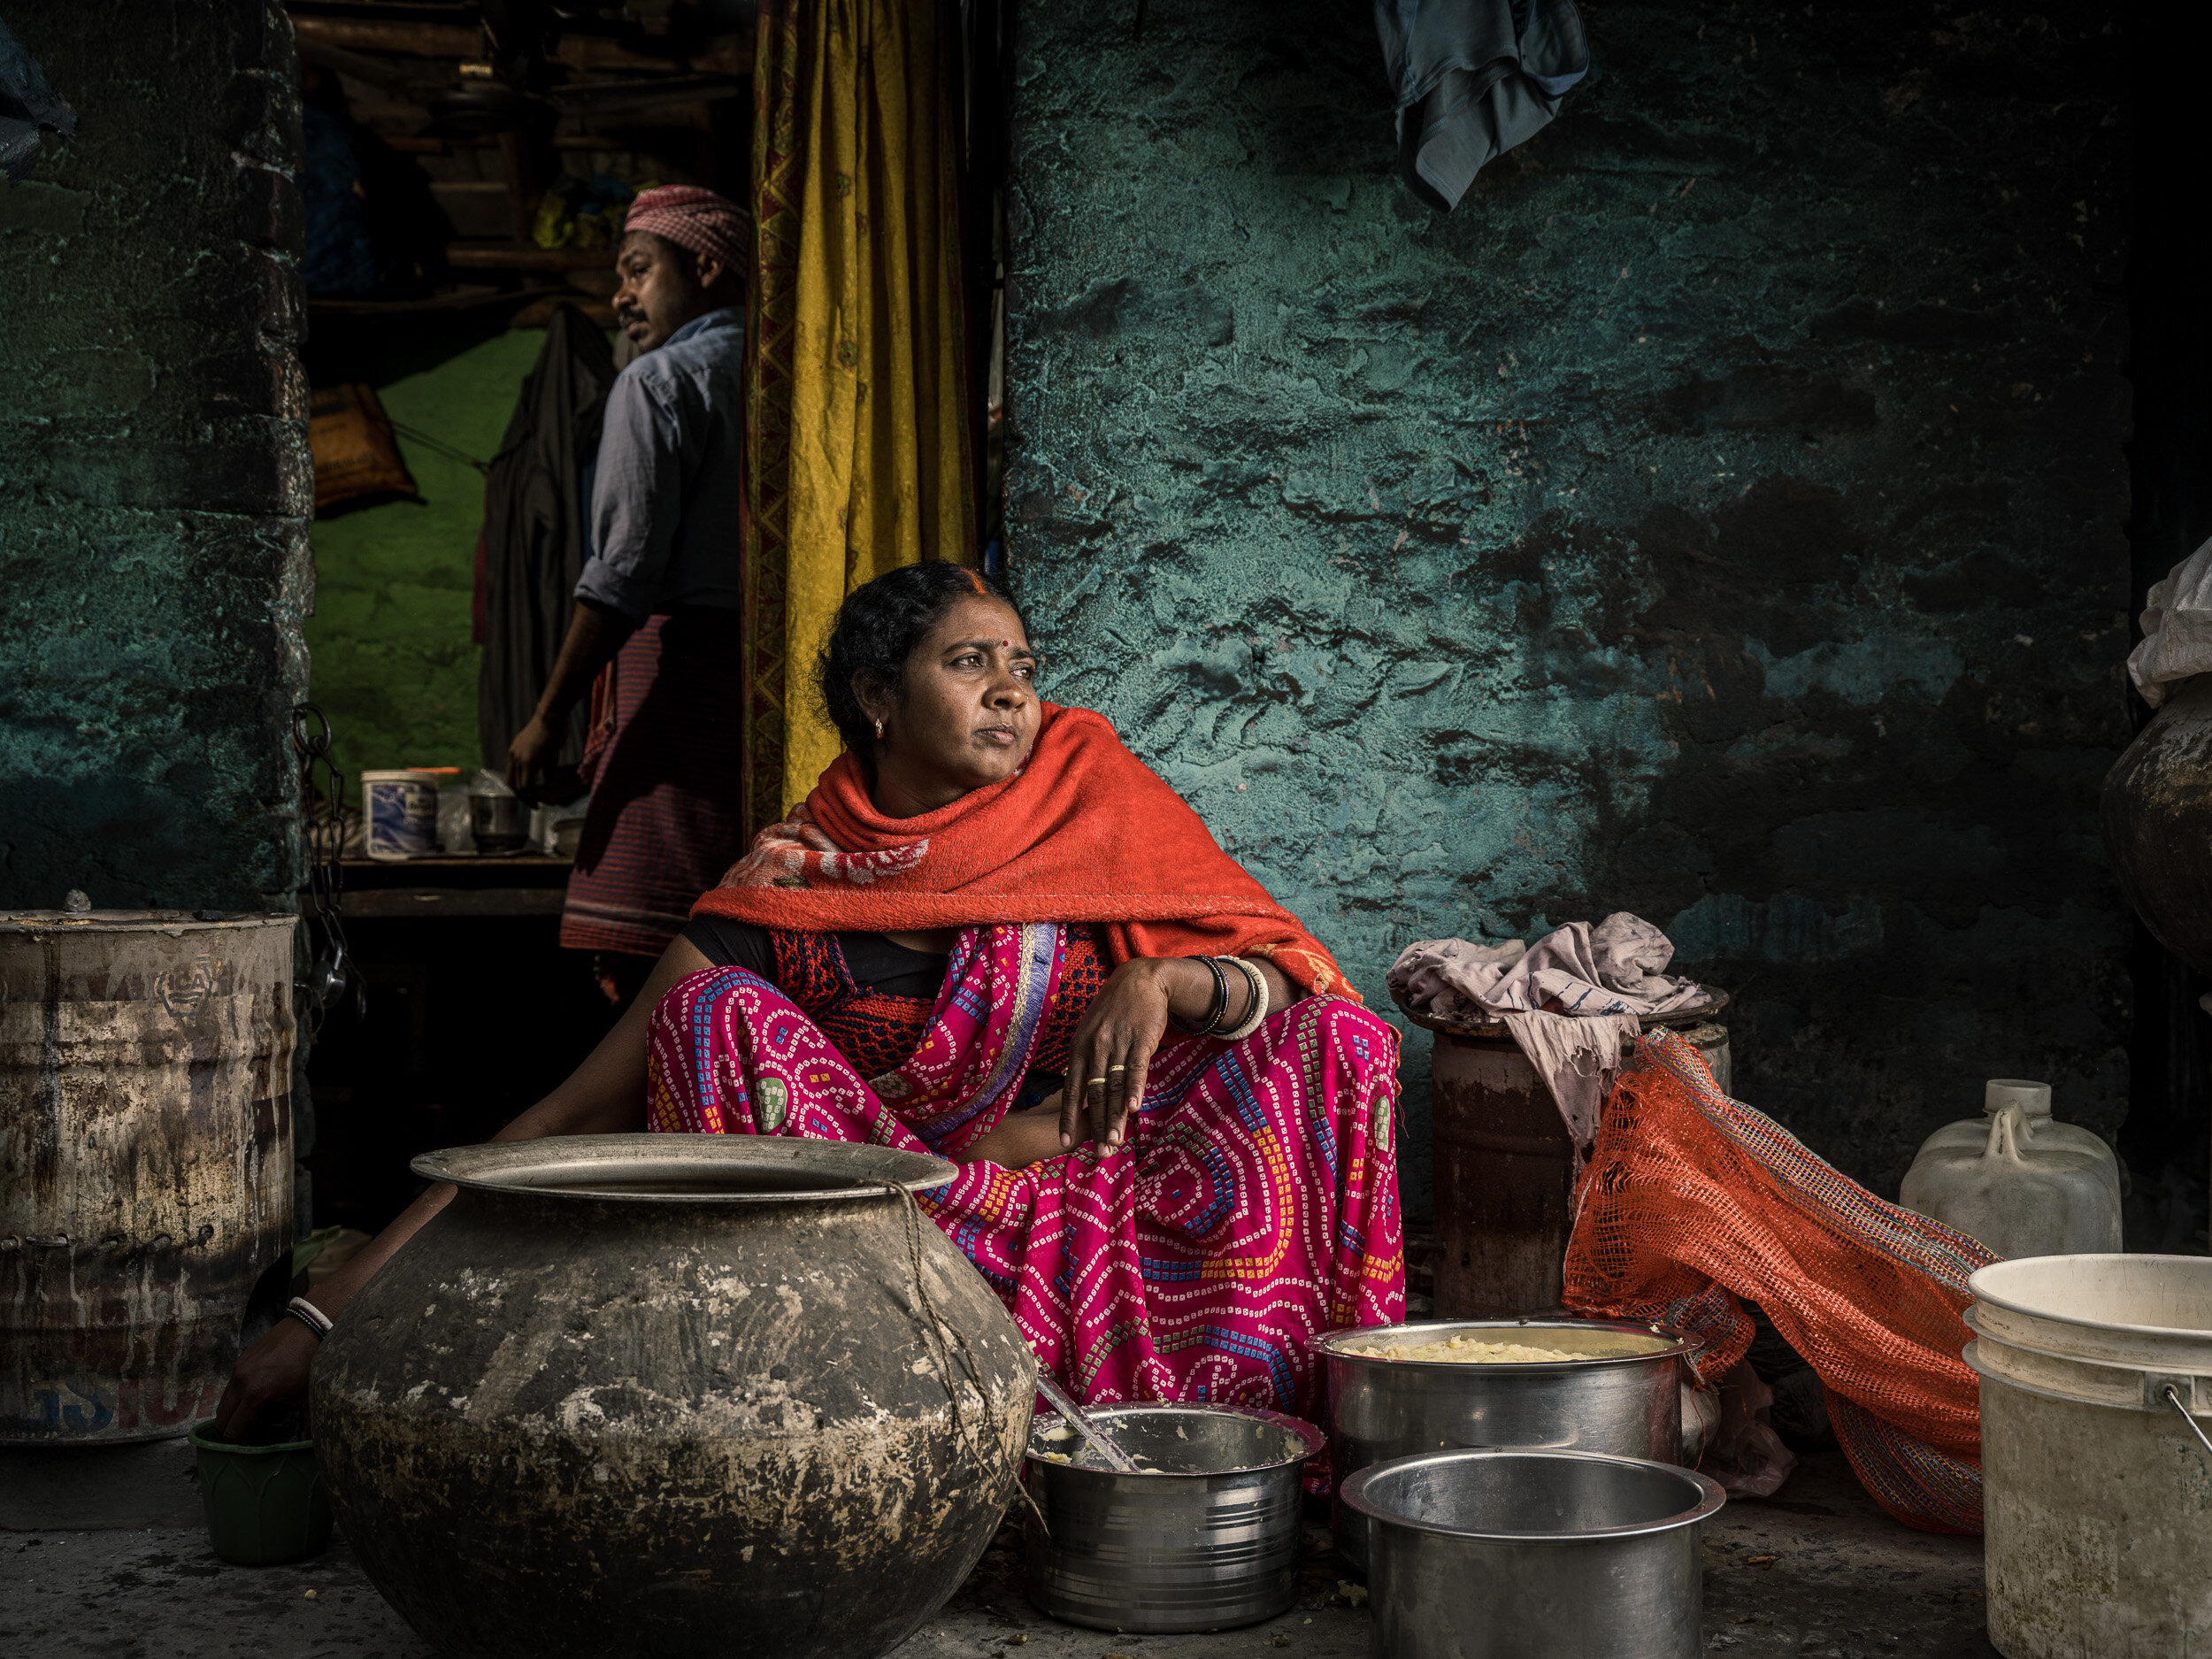
Almost 5 years ago, I was asked by Fujifilm’s marketing department to test drive the then long-awaited and not yet released GFX 50S. My mission was so simple it was a little bit frightening ;-) I had a budget and a couple of weeks to return with a three minute video and a number of stills that would highlight the quality of the camera. As I also wanted to showcase its versatility – the 50S was unusually small and lightweight for a large format camera – I decided to take it as far away from traditional large format cameras’ natural studio habitats as I could, and took it with me on the plane to Varanasi, India. This is what I returned with:
Above: my original GFX 50S video
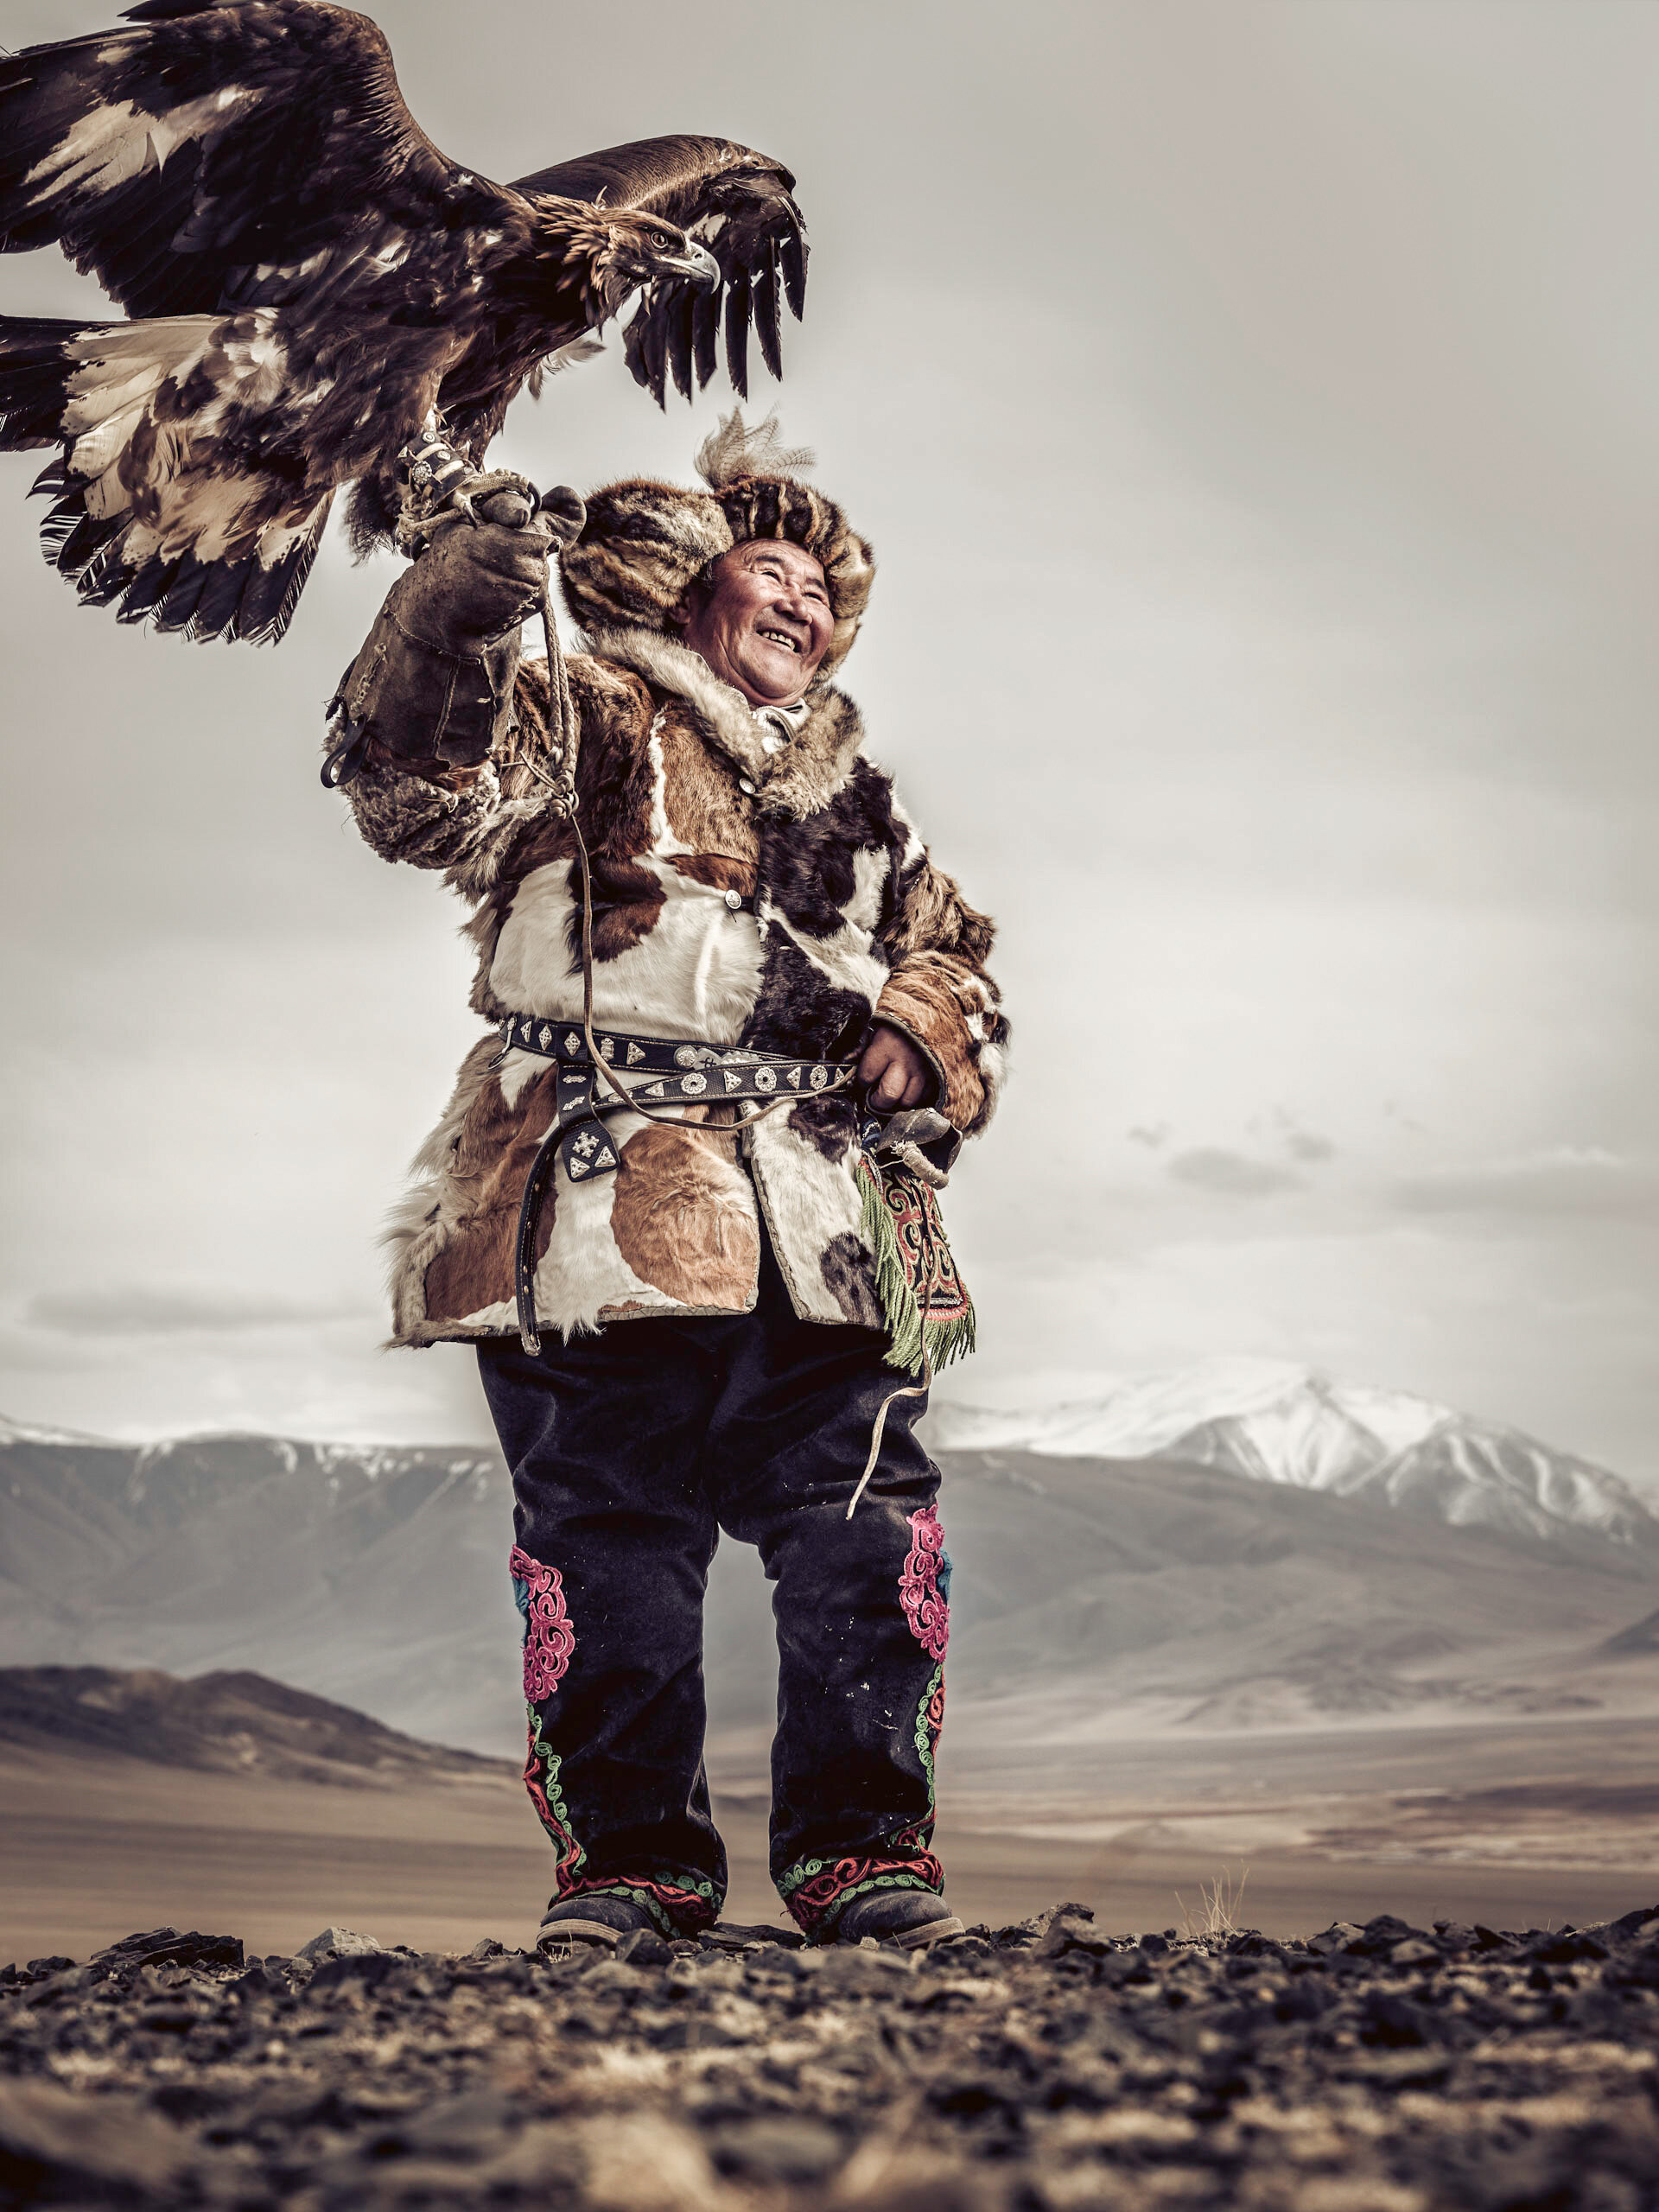
I remember being absolutely blown away by the dynamic range and the resolution after taking those first shots in that little, rather unstable boat on the Ganges. In fact, so much so that I placed my preorder for my personal GFX 50S that same day. Since that trip to Varanasi, I’ve almost exclusively photographed with the various cameras of the GFX ecosystem. I’ve taken the GFX 50S to Mongolia, the 50R to Ethiopia and the 100 to Kolkata. Once you get used to the file quality of the GFX images, its hard to settle for less.
Above: photographing the Omo valley with the GFX 50R in Ethiopia

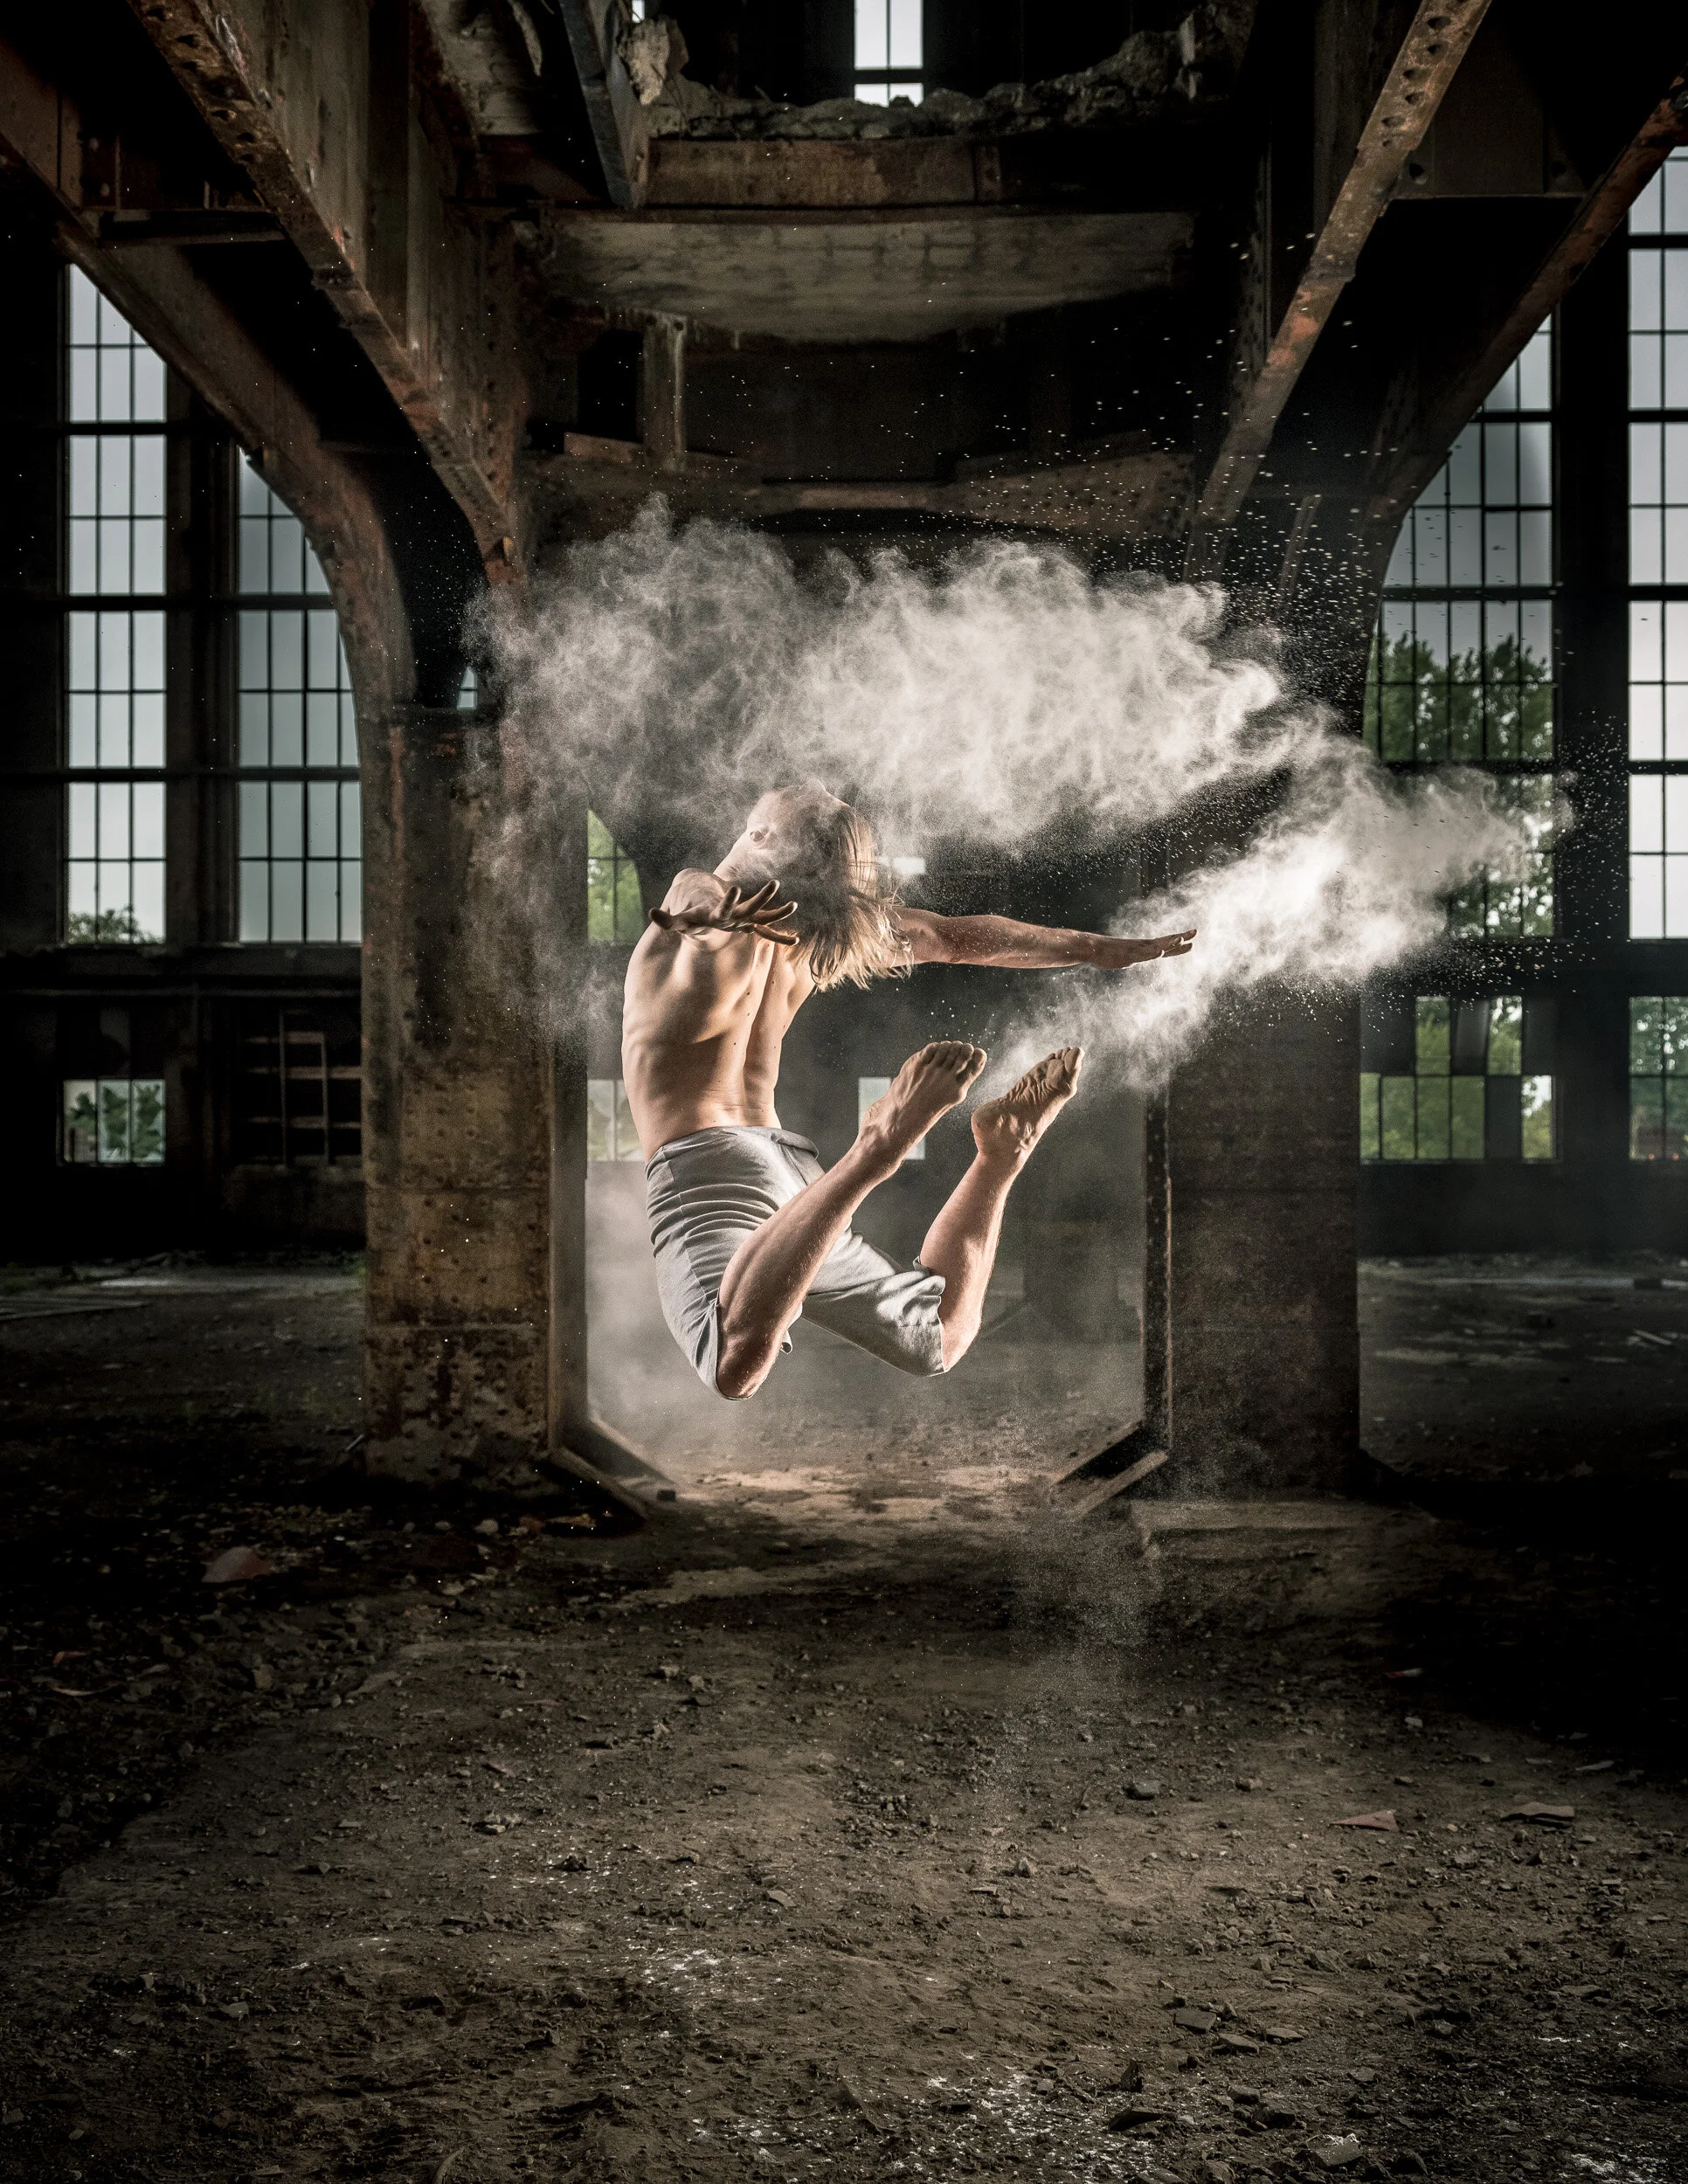
Above: photographing ballerina’s and dancers with the GFX 100S in Belgium
Why the GFX has made me a better photographer
I know they say that gear doesn’t matter and that a good photographer can make great images with a smartphone or even a pinhole camera made out of a matchbox. But have you noticed that the people making these claims are often using the most expensive cameras and lights themselves?
Sure enough, if you’re a beginner and you don’t know your f-stop from your shutter speed, then a GFX probably won’t help you make better images, on the contrary. But you definitely needn’t be a professional (as in ‘I make money from my images’) photographer to use a GFX. In fact, most GFX users I know, aren’t. They’re enthusiasts. And the GXF is definitely an enthusing camera. I don’t make money from my images (apart from selling some prints) and certainly not enough money to economically warrant the investment of a GFX. But as someone with a degree in Economics, I think I can safely say that there’s more to life than just that: I got myself a GFX, not because I needed one, but simply because I wanted one. And while normally, GAS-induced (Gear Acquisition Syndrome) decisions aren’t the best, in this case I’m truly convinced that the GFX improved my photography.
Below: these images were taken all over the world, yet they have one thing in common, they were shot with a GFX.


Why? I think there are two reasons: a psychological one and a practical one. Let’s get the psychology out of the way first. I think I started paying more attention to my photography exactly because the GFX was a big investment that I – objectively speaking – didn’t really need. It was as if I owed it to myself to up my photography game to be proven ‘worthy’ of using a GFX. Maybe I’m more in need of a shrink than of a GFX :-) Or a shrink with a GFX!
The other reason was a more practical one. The GFX is a tough lover at first, playing hard to get. When you nail your shots, the GFX images are absolutely gorgeous. But the slightest mistake you make, slaps you in the face with all its 50 or 100 megapixel power. So the original GFX, which didn’t have IBIS, forced me to be much more methodical about my shooting technique. Did I really need such a low shutter speed? Wouldn’t my depth of field be too shallow if I used that wide open aperture? I found myself thinking more before pressing the shutter instead of wondering what went wrong afterwards. I also started using a tripod more, mainly to get sharper images but the very welcome side-effect was that I paid a lot more attention to my framing and composition. So even though I appreciate the fact that the GFX 100 series and the new 50S Mark II have IBIS for those times that I want to move more freely, I still use a tripod whenever I can.
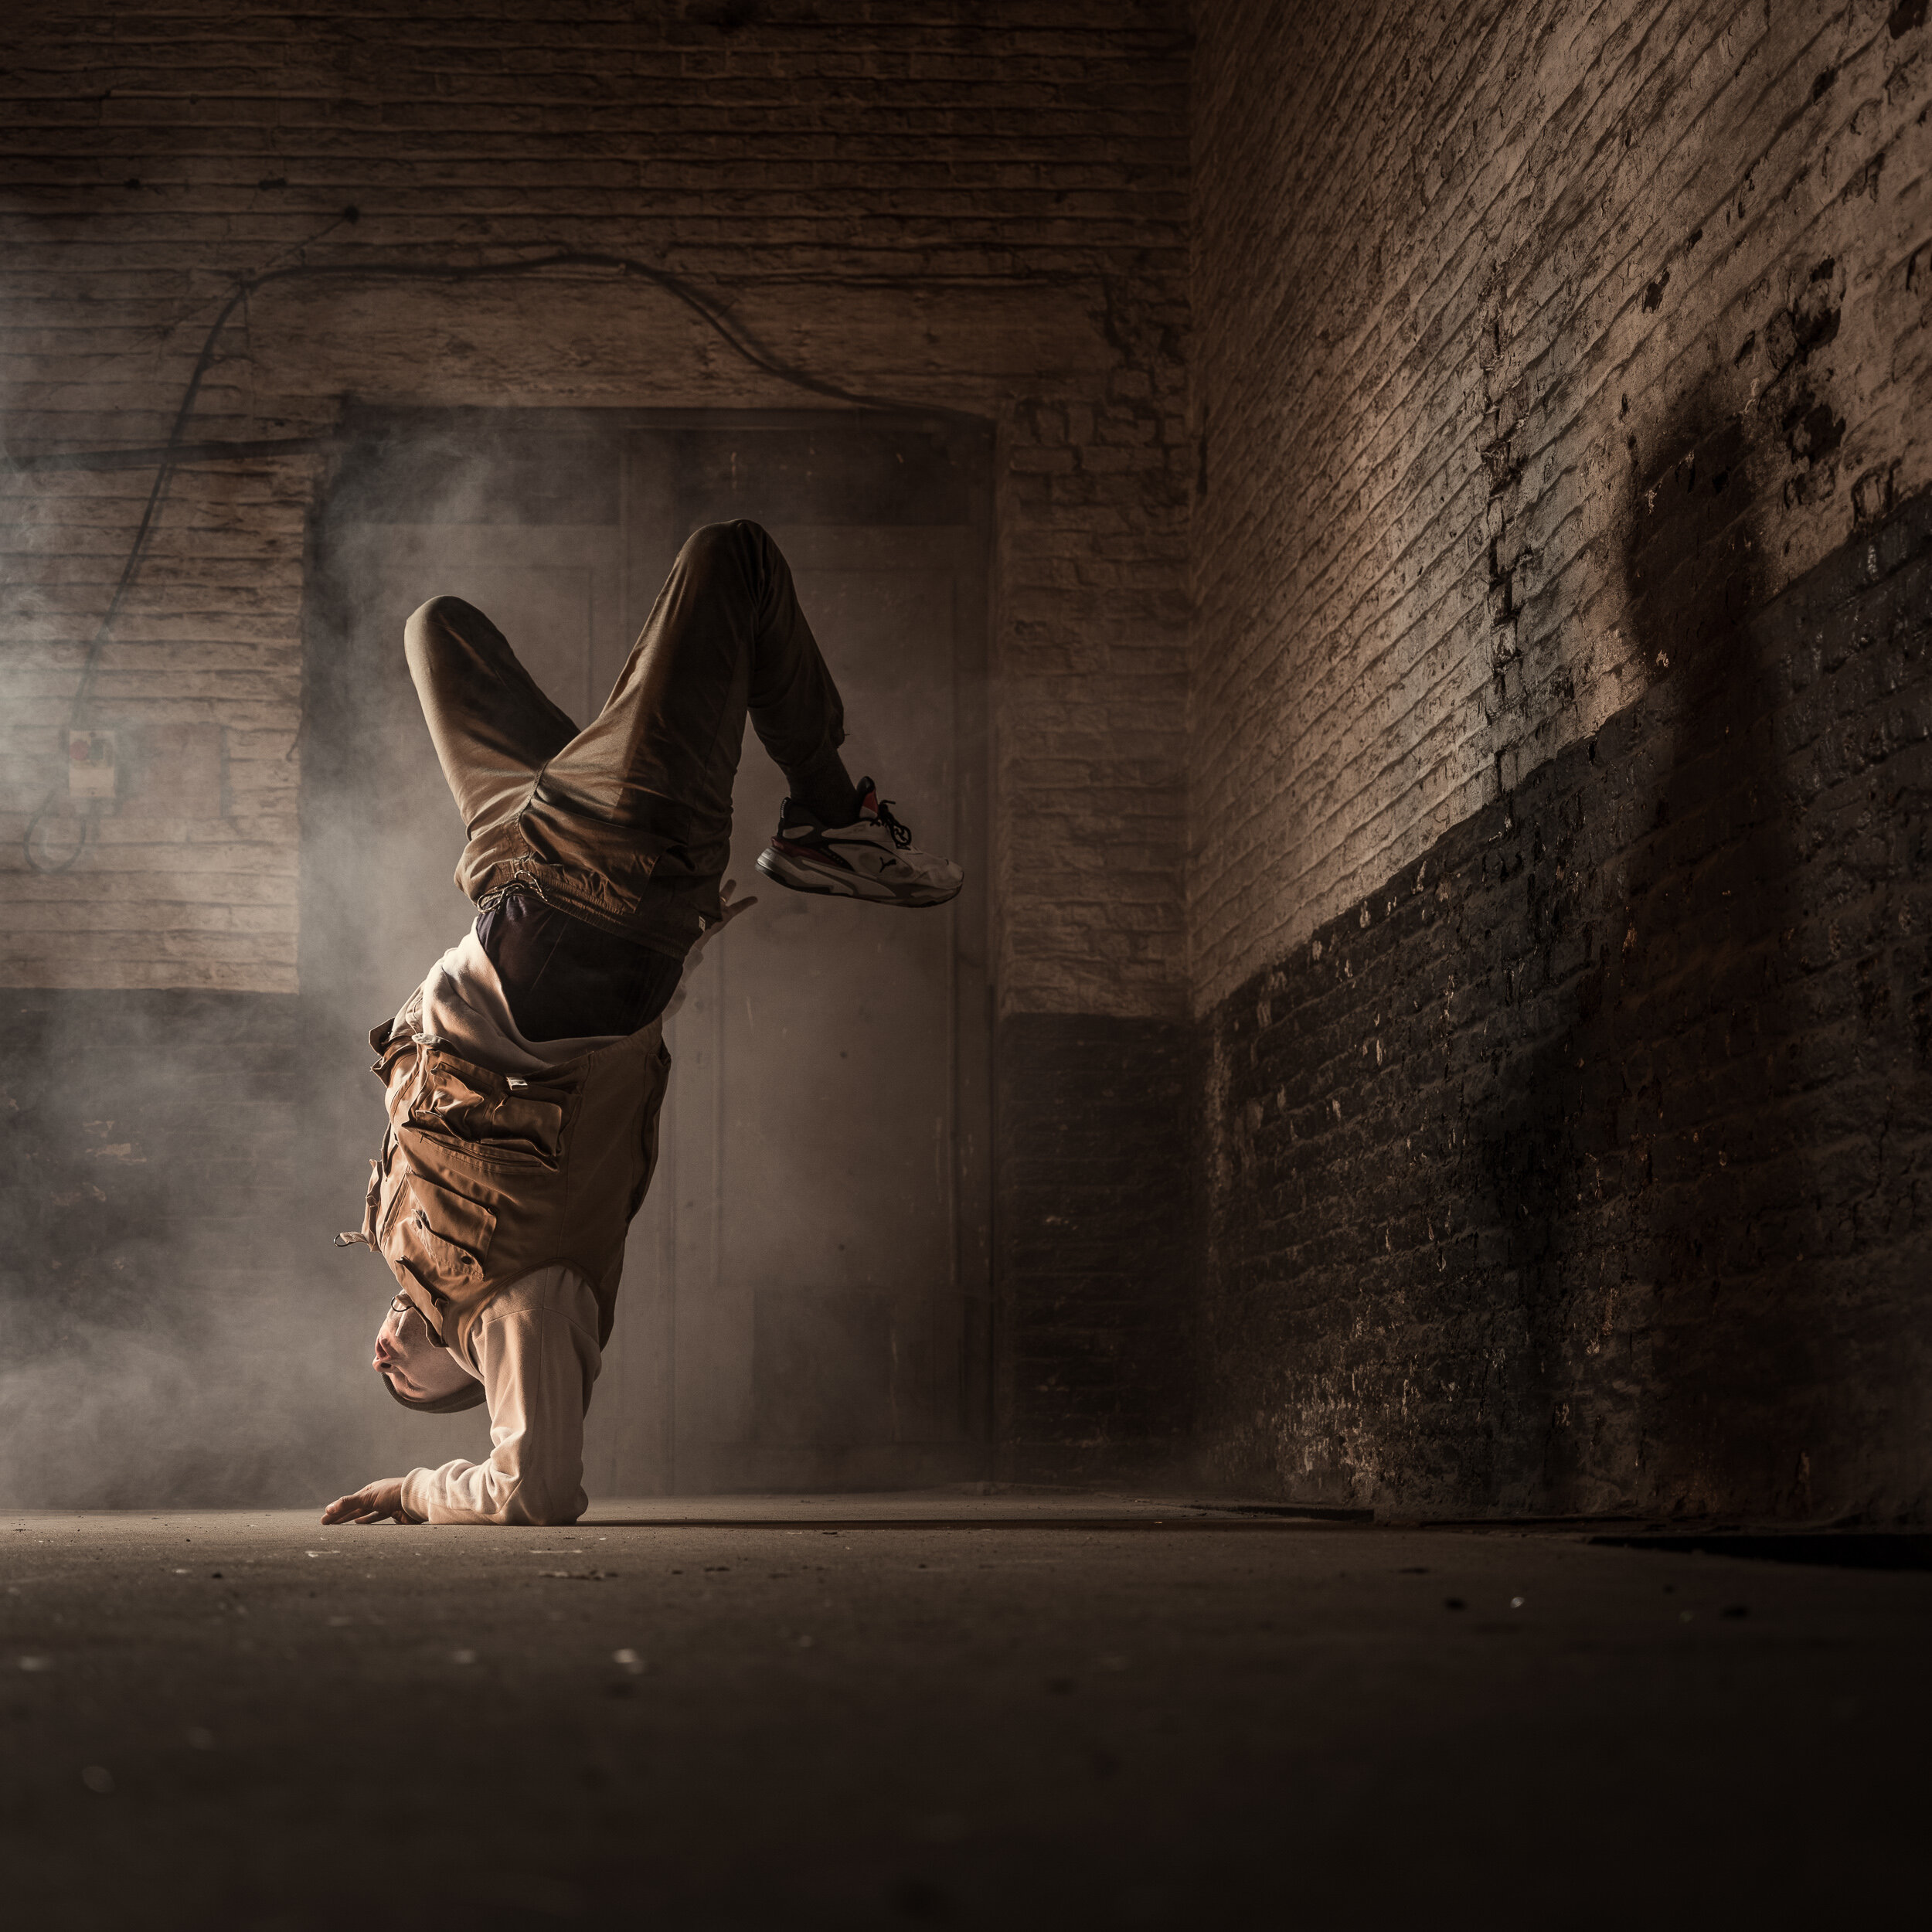
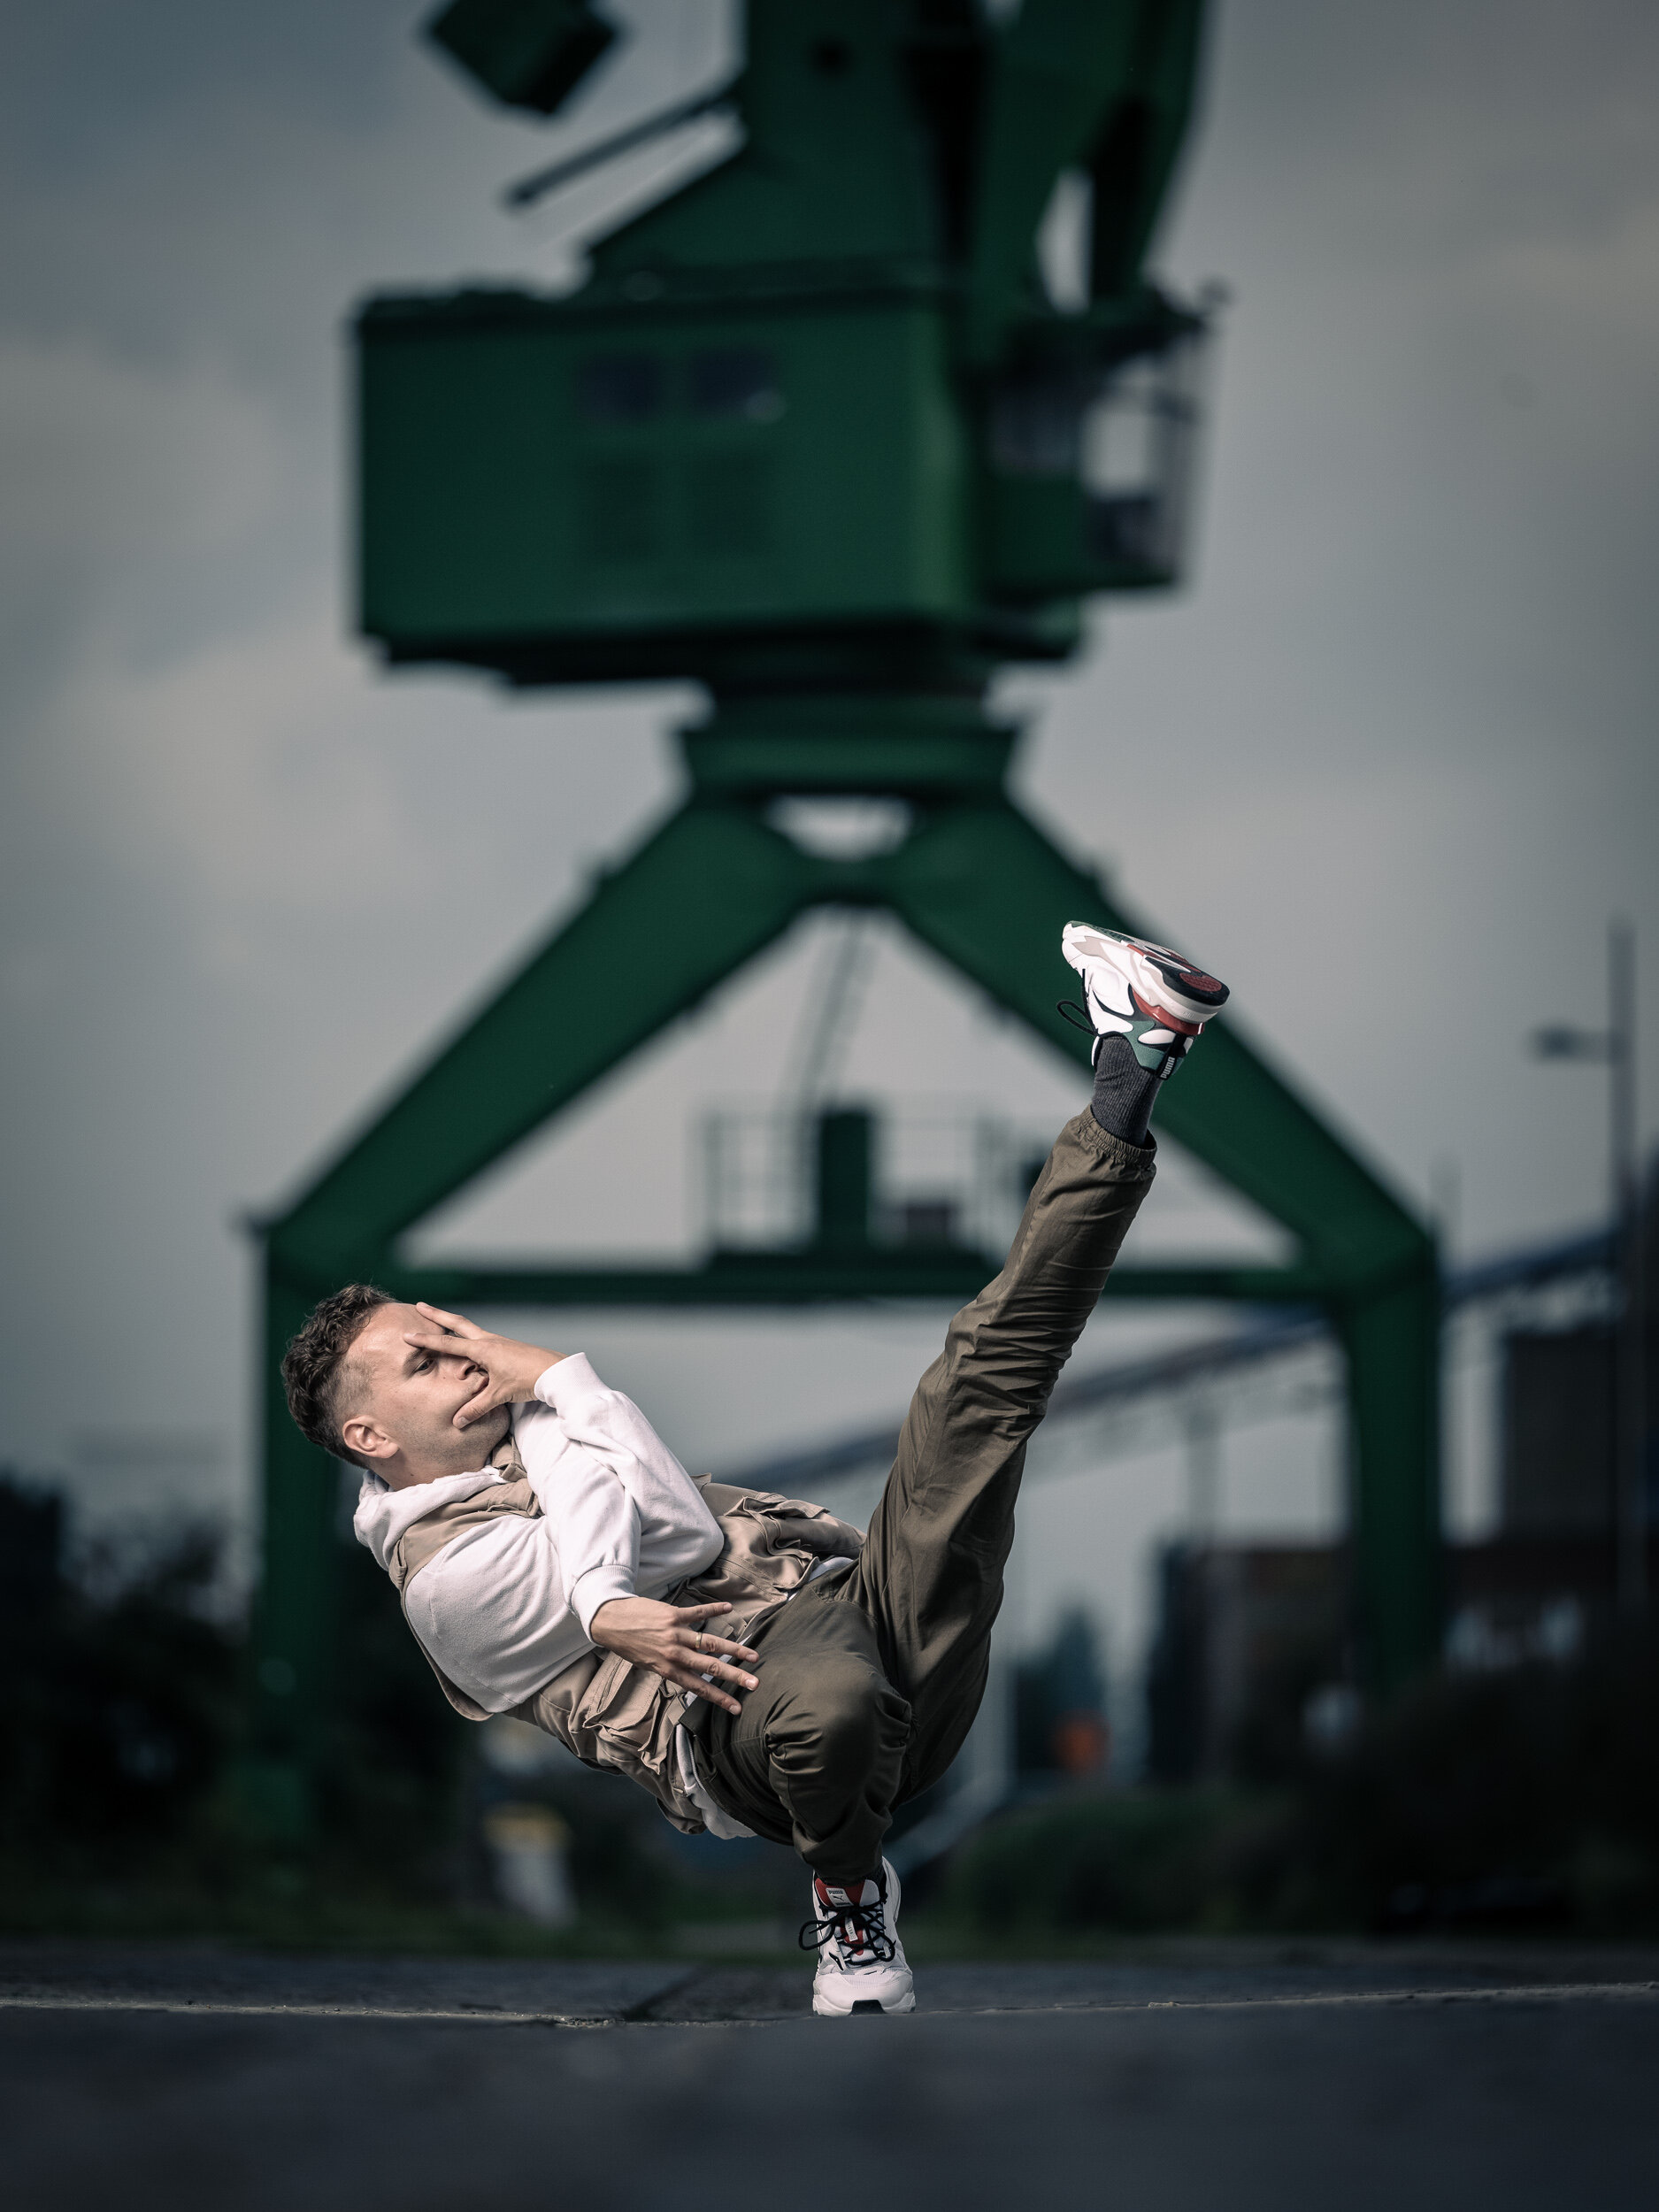
The GFX 50S Mark II

The GFX 50SII and the Fujinon GF35-70mmF4.5-5.6 WR. Photo © Pieter D’Hoop
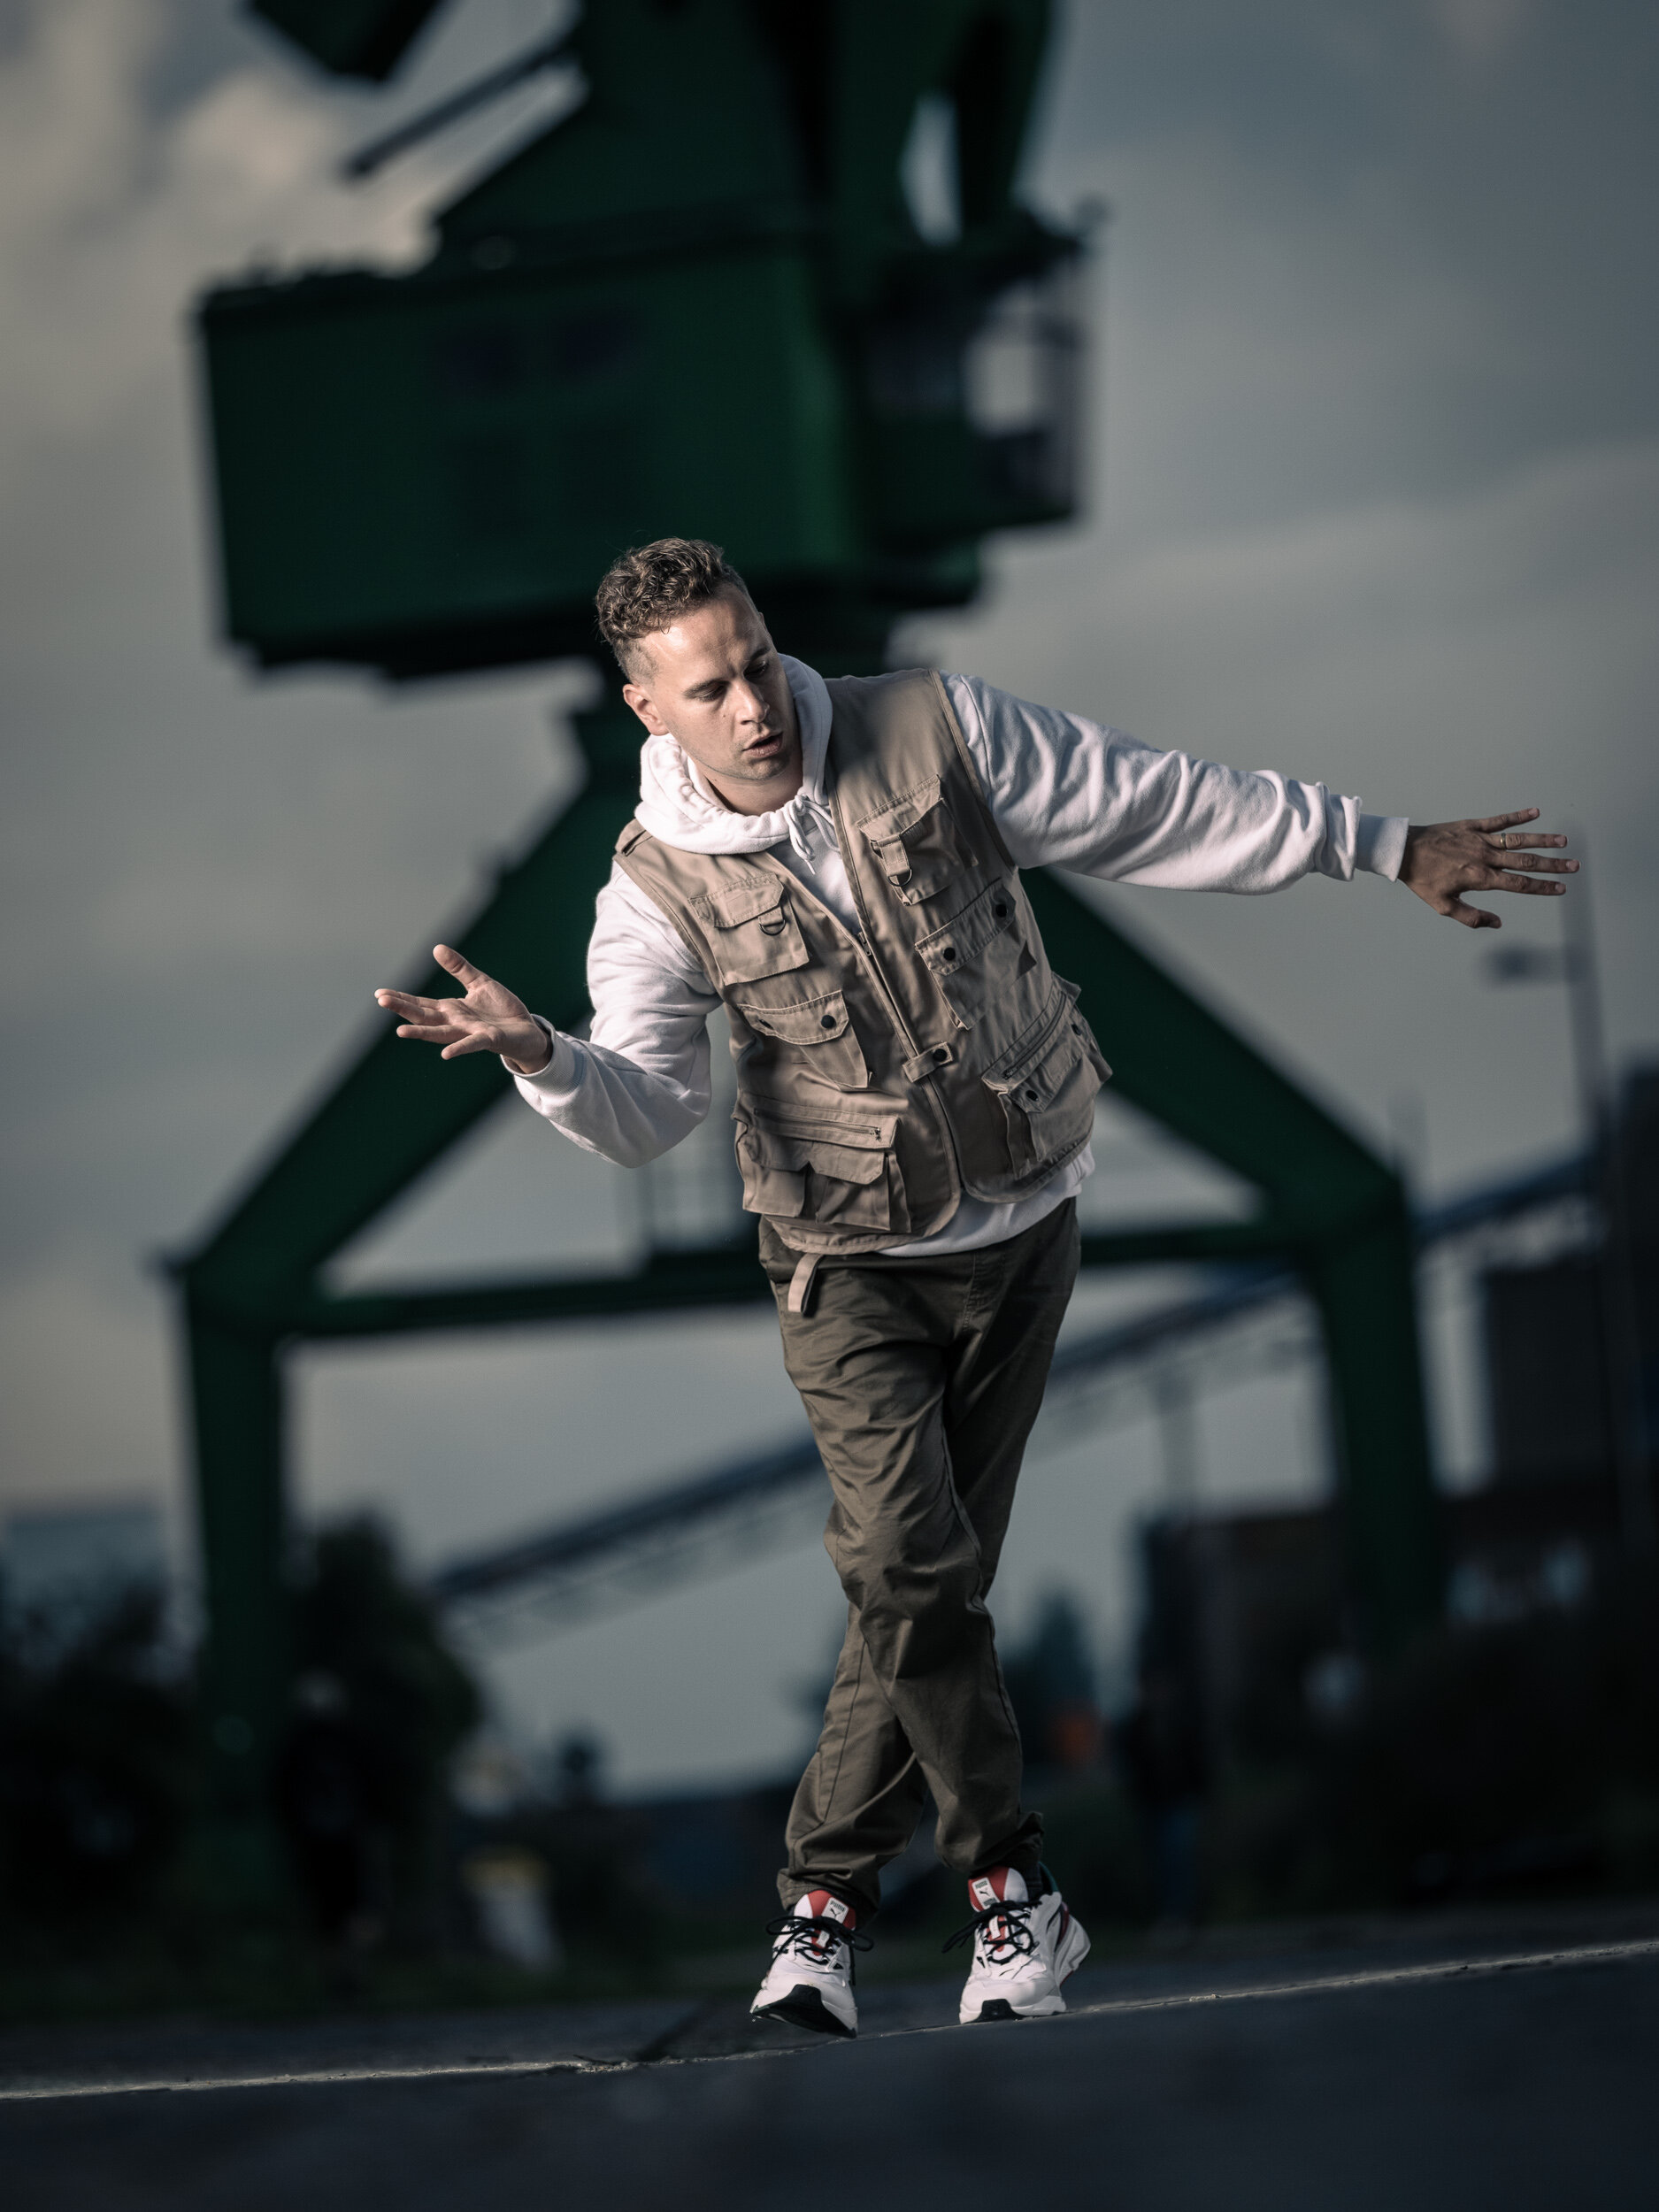
Four and a half years after the official release of the GFX 50S, we now have the GFX 50S Mark II or GFX 50SII as it’s officially called, and I’m happy that Fujifilm thought of me again to try it out. The times being what they are, instead of flying 5,000 miles, I drove 5 miles to a great outdoor location near where I live and instead of scouting Indian character faces, I invited Matthias, a talented hip-hop dancer. I put up a light or two and you can see the result below. The dialogue is in Flemish, but I’ve added both Dutch and English captions ;-) Just click on the CC icon in the player and choose the ones you prefer.
Overall impression

The grey lettering is the only thing that visually sets the GFX 50SII apart from the GFX 100S. Photo © Pieter D’Hoop.
Volume-wise, the GFX 50SII II is identical to the GFX 100S and that’s a good thing. They share the exact same body. The only way to tell them apart is that the GFX 50S II has a small grey logo on its side. If ever you upgrade from one to the other, or you are a GFX 100S shooter that wants a 50SII as a backup, you don’t have to retrain your muscle memory. I won’t bother you much with the other tech specs (yes, it’s got IBIS, yes, it’s 50 megapixel, yes, it’s got two SD card slots, yes, it’s got a touch screen) as you can find them on Fujifilm’s site here.
The body is considerably lighter and smaller than the original GFX 50S. In fact, it’s smaller than some fullframe cameras! This sensor still delivers the same impressive results as it has for me over the past years and the fact that it has IBIS is definitely a good thing as it will help to keep your ISO low and therefore your image quality as high as possible. The new Fujinon GF35-70mmmF4.5-5.6 WR ‘kit’ lens is only $/€ 500 extra when you buy it together with the camera and that makes it a no-brainer.

Excellent image quality, compact and more affordable than some other cameras with smaller sensors. Those are the three main selling points fo the GFX 50S Mark II. GFX50S II | GF23mmF4 R LM WR | 1-500 sec at f - 8,0 | ISO 100
One of my favourite lenses so far is the GF 32-64 f/4 but it’s quite big and heavy. This new GF 35-70 lens has nearly the same specs in terms of focal length, albeit a stop slower on the tele side and it doesn’t have an aperture ring. But it costs a third of the price (a sixth if you buy it in a bundle with the GFX 50SII) and weighs a lot less. If you’re looking for a really lightweight yet versatile package, you could get the GFX 50SII with this 35-70 lens and maybe a GF 80 mm f/1.7 or a GF 110 mm f/2 for those times when you want to get creative with your shallow depth of field.
But maybe the most impressive feature of this camera is the price. The GFX 50SII is sold for €/USD 4,499, including the lens. That’s €/USD 2,000 or 30% cheaper than the original body-only price of the 50S. So, not only are there fullframe cameras bigger and heavier than this GFX 50SII but there are also quite a few that are (far) more expensive. Great image quality in a convenient package at an affordable price. I think Fujifilm has another winner on their hands here!
And it’s not just become cheaper, lighter and more compact than its predecessor. Although it still uses the same sensor, inside, a lot of other things improved as well:
as mentioned, the GFX 50SII has IBIS, allowing you to shoot hand-held at much lower shutter speeds without compromising that medium-format sharpness. In fact, the IBIS in the GFX 50SII is more effective than in the GFX 100S!
new battery (same one as the GFX 100S and the X-T4
the LCD screen can be pulled back a little so the viewfinder doesn’t obstruct it. This may look like a small thing, but it is incredibly handy.
faster processor (the X-Processor 4).

The new Fujifilm GFX 50S Mark II: a fine balancing act between price, performance, weight and volume.
Fujifilm GFX50S II | GF250mmF4 R LM OIS WR | 1-1600 sec at f - 4,5 | ISO 400


Which GFX should you get?
The GFX arrange now spans five cameras: the original GFX 50S, the new Mark II, the GFX 50R, the GFX 100 and the GX 100S. I think for most people, the choice will be between the 50S Mark II and the 100S. The 100S with the same lens will set you back about €/USD 8.000 and while that is incredibly affordable for a 100 megapixel camera, it’s also almost twice the price of the GFX 50SII. The two obvious main differences are the resolution and the autofocus system. The 100S has a hybrid (contrast and phase detection) autofocus system whereas the 50S is contrast-detection only. If you shoot mainly landscapes, architecture or more formal portraits, and you don’t need the resolution of the 100S, the 50SII will be a great entry point into the wonderful world of ‘more than fullframe’ cameras. And should you get bitten by the GFX bug and you want to get a 100S after a while, it will still serve as a cost-effective backup body.

A camera system is only as good as the lenses that go with it. As such, the GFX 50SII is in very good company! Image © Pieter D’Hoop
If you do require the extra resolution, or you like to experiment with various crops and aspect ratios, or if you want a more powerful autofocus system, the GFX 100S might be a better fit. Either way, you’ll be getting yourself one of the best cameras that is currently available, backed by an impressive lens lineup to choose from and if it improves your photography as much as I feel it has improved mine, either choice will be a great one.
For another Belgian photographer’s look at the GFX 50SII, check out my friend and fellow X-Photographer Pieter D’Hoop’s video here. For a more in-depth look at the new features of the GFX 50SII and a comparison with the original GFX 50S and the GFX 100S, check out my good friend Matt Brandon’s first look here.
I love the fact that the GFX images have a lot of leeway in terms of further postproduction. This image was edited with a Creative Profile from my Creative Profiles Starter Pack. Or… get the bundle of my three Creative Profiles packs and my Lightroom Preset Pack. Both are currently 50% off (until September, 15). These are the exact same presets and profiles that I use to edit most of my images.


If you want to know more about working with flash on location, check out my Dutch book here (English PDF ebook here) or my Location Lighting Masterclass (English | Dutch). The Location Lighting Masterclass is currently 50% off until September 15! See the video below for more info about this unique tutorial.
Watch the replay of my Luminar AI webinar here
For a limited time, you can watch the replay of my Luminar AI webinar ‘10 Reasons to love Luminar AI’ below. If you’re interested in Luminar AI, get it today before my 20 euro/usd discount code expires!
Save €/US$ 20 with code MORETHANWORDS20 until August 31, 2021
Something that can easily take fifteen minutes in Photoshop – if you even know how to get started – can be done in Luminar AI with two sliders in 10 seconds.
Luminar AI introduces... Bokeh AI
Skylum officially announced Portrait Bokeh AI today. This new tool allows you to reduce the depth of field of your portrait photos, using artificial intelligence. In the video below, I give you a quick introduction to the potential (and some of the limitations) of this exciting new update!
For existing Luminar 4 users there is currently a discount where you can upgrade for US$/€47 (1 license) or US$/€59 (2 licenses). TIP: use code MORETHANWORDS and you will save another US$/€10!
Not a Luminar user yet? Then you can get Luminar AI for €79 (1 license) or €99 (2 licenses). Use code MORETHANWORDS during the checkout and you will save another €10. That's a very fair (if not low) price for a plug-in this capable!
Do you want to get started with a newsletter or email marketing? Then read this first!
Whether you run a photo club and you want to start a newsletter or you’re a (semi-)professional photographer and you want to inform your (potential) customers about new promotions, services or products… you need a platform to send those emails. Because… just sending an email to yourself with a few hundred names in the bcc field, not only comes across as very unprofessional, but you also run the risk of being blacklisted by your internet provider for spam!
No… a dedicated email marketing platform really is what you need. Only… usually those cost a lot of money. Month after month after month.! However, every once in a while, a great opportunity comes along. In this case, an opportunity that lets you send up to 10.000 emails a month, for a ridiculously low one-time fee. In this short video I tell you all about it!
Oh, and before I forget, you have a 60 day money-back guarantee!
Creating and editing videos online with Moovly
If you've ever had to make or edit a video, you know it's not that easy. Recently, I came across a great online tool, which I would like to introduce you to in this five-minute video below. The company (and the tool) is called Moovly, and although they operate internationally, their headquarters are located in… Ghent, which is where I live. All the more reason to put Moovly in the spotlight.
Do you sometimes need to make an online marketing video, but don't have the budget to outsource it? Or maybe you want to 'pimp' an existing video with some stock footage? Or add subtitles? Moovly can do all of the above and more. Below is an ultra-short summary of what Moovly can do – it can do a lot more, but those are the core features. If that got you interested, I have some good news for you! I'll tell you more about that below the video.
I like it, but what does it cost Piet? Is this another subscription thing?
I hear you, I try to avoid subscription software, too. So read on. I have some good news for you! Moovly, like so many other online tools, is normally only available through a subscription. Those start from 299 US$ per year. And while that's not expensive for what Moovly offers, it might put this service outside the budget of individuals or small businesses. Wouldn't it be much easier if you could just pay once and keep using the software? Well… exceptionally, that is possible! Until the timer below hits zero, Moovly has a 'lifetime deal' promotion. You pay once, and you can continue to work with the software! How cool is that!
This deal is worth it for the stock video alone!
Moovly has a lot to offer: it is easy to use and yet powerful. But… the biggest reason why I got it myself is because it includes acces to thousands of Full-HD stock videos from the StoryBlocks video library that you can use in your Moovly projects. StoryBlocks is a major provider of royalty free stock video. Do you have a project where you quickly need a shot of an airplane landing? Of course you can drive to your nearest airport with your video camera, but if security doesn't stop you, your common sense should: half a day for 30 seconds of video? Moovly found no less than fifty videos in a matter of seconds, that you can use in your project!

A simple search yielded 50 stock videos of landing airplanes. If only for that access to the stock video library, Moovly is worth purchasing!
So for that reason alone, Moovly is worth purchasing, especially at the current lifetime deal offer. In the couple of weeks that I've purchased the deal myself, I've already more than recouped the purchase price through the stock videos that I have used in my projects.
Which 'tier?'
You can purchase the Moovly lifetime deal via this affiliate link. There are 5 so-called 'tiers' or options. Tier 1 already starts at 49 US$ (lifetime!) but I advise you to choose Tier 2, which is the one I got for myself. It costs US$129 but offers a lot of interesting extras, such as the possibility to have your videos automatically captioned, record your screen and your webcam, so you can make tutorial videos, and more. If you don't need those extras, Tier 1 is of course even more of a no-brainer.
60 day money back guarantee
US$ 129 is really not a lot of money for what Moovly offers with its second tier. But if after purchasing it, you would find that this cool online video creation and editing is not for you after all, you have 60 days to request your money back. No questions asked!
As you can see, I'm very excited about this tool, and that’s not only because these guys live in the same city as I do! As they say over here: ‘Vrie wijze marchandieze veur vrie weinig geld’ (‘Very cool software at a bargain price’).
“Vrie wijze marchandieze veur vrie weinig geld, diene Moovly! (That’s the local idiom for saying great stuff at an incredibly affordable price)”
Choosing your own starting values for Lightroom's local adjustment tools
in Lightroom
Does this sound familiar? Once you've applied a setting to Lightroom’s Brush, Radial filter, or Graduated filter, those settings seem to haunt you just about everywhere and all the time? In this short video tip, I explain how you can get rid of that behaviour, apply your own default settings and how you can also change them again if necessary.
Photoshop-tip: putting type on a path

I wanted to credit photographer Michael Schnabl for this picture he took of me. The image is being used in the Visual Storytelling Conference, where you’ll be able to watch choose from over 80 hours of tutorials that are being broadcast live between May 15 and May 17. You can read more about the conference in this blog post.
But… How do you put type on a path? You’ll find the answer in this video tutorial below. Want to see more tutorials and training like this? Then make sure to register for the Visual Storytelling Conference.
The Visual Storytelling Conference
Register for free for the Visual Storytelling Conference
If you’re interested in visual storytelling by means of photography or videography, then the online Visual Storytelling Conference is THE place to be from May 14 to May 17.
The most important part of the Visual Storytelling Conference is a live 'virtual summit' that takes place from Saturday, May 15 until Monday, May 17. There are keynotes by National Geographic photographer Mike Libecki and internationally acclaimed landscape and cityscape photographer Elia Locardi. Furthermore, there are two parallel tracks that offer various one hour lectures about the creative, practical and even business aspects of photography and videography.
The entire three-day summit can be watched live for free: simply register with this link. That’s where you’ll also find the entire schedule and a list of all the speakers.
I’m honoured to have been asked to do two talks: one about flash photography and another about Local Adjustments in Lightroom.