Lightroom

The 2016 edition of the 5 Day Deal: What's in it for you?

From now until Wednesday, October 19th, noon PST, it's 5 Day Deal time again! The 5 Day Deal is a unique bundle of photographic training content. If you were to buy every item separately, you'd be looking at a total bill of over $2.500. Now, you're only paying $97, a savings of more than 95 percent! The bundle contains over 60 hours of video training, 15 eBooks and almost 500 Lightroom presets and Photoshop actions. In total over 25 gigabyte of training goodness.

From Lightroom presets over video courses on how to shoot wine or photograph models to a complete landscape postprocessing photography course: there's something for everyone in this bundle.

From Lightroom presets over video courses on how to shoot wine or photograph models to a complete landscape postprocessing photography course: there's something for everyone in this bundle.

Of course, the real question is: 'What is this bundle worth to you?' Unless you're really into all genres of photography, probably not the full $2.500. But I can guarantee you that even if you're only remotely interested in photography, the 5 Day Deal bundle is certainly worth more than the measly $97 it's selling for. In fact, this bundle will do more for your photography than the umpteenth camera bag or a shiny new UV filter. 

To help you determine if it's worth your dollar (well, 97 of them), I've broken the bundle down into three typical areas of interest: general postprocessing, landscape photography and portrait photography. You'll see that even if you're only really into one of those three areas, the bundle is a steal. Heck, if you're into two or more, you should already be ordering!

1. You're into Lightroom and Photoshop

Postprocessing seems to be the main theme of this year's bundle, so if image editing is your thing, you're in for a treat. The bundle is ideal to hone your editing skills over these cold winter months and get you ready for a great start in 2017. There's hundreds of Lightroom presets and Photoshop actions, textures and loads of training videos. There's also a lot of HDR training, and I mean photographically interesting HDR, not the headache-inducing variety! The total value of the highlighted items alone is over $1.600. The 5 Day Deal price is less than ten percent of that. If you're a Lightroom or Photoshop user, this bundle really is a no-brainer.

2.  You're mainly interested in nature photography, landscapes, cityscapes and how to postprocess these

The total value of the highlighted items is about $700. From previous 5 Day Deals, I remember the excellent quality of the stuff that people like Jimmy McIntyre, Klaus Herrmann and James Brandon put out, so I'm looking forward to discovering their new courses. Also, note that I've only counted items that have a direct relationship to landscape photography. There are lots of resources, like the many preset packs, that will without a doubt also be useful when you're editing your landscape images.

3. You're mainly interested in portrait photography and portrait retouching

The total value of the highlighted items is also some $700. Again, there are some hidden gems in this line-up. For example, I really enjoyed Serge Ramelli's no-nonsense approach to compositing: he photographs a model and then puts her in front of a different background. This course alone by itself normally costs double the entire 5 Day Deal bundle price.

Other areas of interest

But that's not all. There's also more general, introductory courses such as David duChemin's 26 part email course on the one hand but also some highly specialized ones on the other: how 'bout an in-depth course on Photo Mechanic (I know I can use one since I'm using this app more and more as a front-end to Lightroom). Or what about a course on how to photograph wine? It's all there.

If you're still in doubt, here's 5 final reasons why you should really consider this bundle:

The ever-funny-yet-to-the-point Zack Arias has written an eBook of over 100 pages with business advice for photographers. It's an excellent and at times hilarious read.

The ever-funny-yet-to-the-point Zack Arias has written an eBook of over 100 pages with business advice for photographers. It's an excellent and at times hilarious read.

  1. This way of learning is one of the cheapest to improve your photography skills, at your own pace, when and where you want it. Furthermore, there's always a couple of hidden gems in bundles like this. For example, I thoroughly enjoyed Zack Arias' 'Get To Work - Business Primer' eBook. It's not something I'd probably buy (in fact, I didn't know it existed), but it was included in the bundle anyway! 
  2. A lot of this bundle's resources are new and if they aren't new, at least they've never been in any other 5 Day Deal bundle, so there's no overlap with previous 5 Day Deal purchases.
  3. If you're more interested in the business side of photography, there's a couple of interesting items as well, like the afore-mentioned guide by Zack Arias. Zack's studio is doing great now, but he once was nearly bankrupt. So, he knows what he's talking about.
  4. The bundle is gone forever on October 19th, noon PST (that's 9 PM Brussels time).
  5. 10 percent of the entire turnover (not the profits, but the turnover, so almost $10 on every sale) goes to charity. Since the start of the 5 Day Deal in 2013, over $650.000 was donated to good causes. For this year, the 5 Day Deal team is hoping to achieve $250.000 of charity donations and they even silently hope to reach $350.000, which would bring their total over one million since 2013. To that effect, upon checkout, you can choose to pay an extra 10% ($9.7) which goes entirely to charity. And, as a token of good karma, you get an extra bonus-download worth $250. Some 50% of people who bought the bundle so far have chosen this option. It's called 'Charity Match', you'll see it on the 5 Day Deal page.

You see, I'm shutting up already. Yes. I'm that easy :-)

What's the big deal about The Big Deal?

If you're reading this blog, chances are that you are into photography, postprocessing or probably even both. Well, I've got some interesting news for you! There's a new photography bundle out, The Big Deal. I'll immediately cut to the chase: this bundle, which is only available until July 4th, contains photography software, video tutorials, eBooks, Lightroom presets and Photoshop actions. The combined value of all the goodies in the bundle is over $3.000, yet it's priced at $99... and that's really a steal! 

Generally, there's a lot of 'filler' content in these bundles: stuff that you even would not want to get for free, let alone pay for it. But the Big Deal is much more about 'killer content' than it is about 'filler content'.

Let's have a look at what's inside. I won't list everything - there's a full list available over here - just my personal highlights.

Software

Although there's a lot more software in The Big Deal, I've limited myself to my personal top-3:

1. Photo Mechanic 5

More and more high-volume photographers who are using Lightroom, are starting to use Photo Mechanic as a front-end to Lightroom. Instead of waiting forever for Lightroom to build 1:1 previews, they use Photo Mechanic for the culling (selection) of the best images and then import only the selected ones into Lightroom. Ratings and Color Labels applied in Photo Mechanic can be read by Lightroom.

If you're a high-volume shooter, Photo Mechanic is an ideal 'front end' to Lightroom: do your culling in Photo Mechanic and your developing in Lightroom.

If you're a high-volume shooter, Photo Mechanic is an ideal 'front end' to Lightroom: do your culling in Photo Mechanic and your developing in Lightroom.

If you want to speed up your Lightroom workflow, Photo Mechanic is the way to go. In fact, Photo Mechanic only has one disadvantage: at $150, it's more expensive than Lightroom itself. If you get The Big Deal, it's included in the $99 bundle. For some of you, this should be enough to go for the 'Buy Now' button, so I've included one below, just for your convenience :-) By the way, if you want to see a video on how I use Lightroom and Photo Mechanic together and how it could speed up your workflow, check out this recent blog post of mine.

2. Tonality by Macphun

After Silver Efex Pro, Tonality by Macphun is probably the best Black & White software out there. It's got tonnes of presets and what I especially like is that it has built-in layer capabilities: this allows you for example to blend what one preset does to the sky and what another preset does to the foreground

Tonality (Mac-only) has the ability to work with layers inside the application. This lets you combine presets or easily fade their effect.

Tonality (Mac-only) has the ability to work with layers inside the application. This lets you combine presets or easily fade their effect.

Normally, it's about $60, now it's included in The Big Deal.

3. Clarity by Topaz Labs

If you like the Clarity slider in Lightroom, you'll love Clarity by Topaz Labs: it's like a whole plug-in dedicated to creative sharpening effects. It's one of the favorite plug-ins of master retoucher and compositer Glyn Dewis, whose videos are also included in the bundle!

Clarity is normally around $50, now it's included in The Big Deal.

Video Tutorials

There is a plethora of video tutorials included in The Big Deal. Below is my personal top-3. Just as with the software, some of these tutorials cost more if you buy them separately than if you get them in the bundle.

1. Language of Light, Volume 1 by Joe McNally

If you want to learn about off-camera flash, no better source than Joe McNally. I've bought this tutorial myself a couple of years ago and it's worth every penny of its $120 price tag. So this is another example of a tutorial that by itself costs more than the whole bundle itself!

2. Retouching and Compositing Video Bundle by Glyn Dewis

If you're into compositing, British guru Glyn Dewis is your man. I own his book on compositing and it's excellent. I've also seen him live on a couple of occasions and the man knows his Photoshop stuff and he's witty to boot. This bundle contains several of training and again, when purchased separately, would cost more than the whole Big Deal Bundle.

3. Photoshop Training with Dave Cross

Dave Cross is another one of those Photoshop giants. He's got three courses in The Big Deal: one on working non-destructively, one on selections, channels and masks and one on automating Photoshop. 

This is just my personal top-3, but there's also Lightroom training by RC Concepcion, a video tutorial on how to use Photoshop for video editing and lots more. Again, you can see the whole list here.

Presets and actions

Finally, there's a bunch of Lightroom presets and Photoshop actions in the bundle as well, like Lighroom guru Jared Platt's comprehensive preset pack, by itself a $115 value.

Conclusion. Is it worth it?

There's lots more interesting stuff than what I've listed in this post but ultimately, you're the only one who can decide on whether this bundle is worth it or not. What I generally do in cases like this, is have a look at the entire list (scroll down a bit in this link), and check what stuff is in there that I'm really interested in. In this particular case, that would be well over $1.000. So the way I look at it is I get a 90 percent discount on the stuff that really interests me, and I get all the other stuff thrown in for free, in which there will probably be some hidden gems, too!

But that's just me and my rational approach. You could just go and say '$3.000 worth of photo stuff for $99?' That's a no-brainer :-)

Disclaimer:
In the interest of full disclosure: the above links are affiliate links. If you purchase the Big Deal through the links in this blog post, MoreThanWords receives a commission that is paid for by the seller. In other words, it does not cost you anything extra and it helps me pay the bills of running this site and all the free content and videos that are on it. Rest assured that I don't simply advise this bundle because I'm an affiliate. In fact, I have the opportunity to promote bundles like this one quite regularly, but there's a lot of chaff amongst the wheat. So, I only promote the ones that I think are interesting, like this one. If you have any questions, feel free to ask them in the comments.


Speed up your Lightroom workflow with Photo Mechanic and get 33% off + bonuses

I love Lightroom, but if there's one thing that frustrates me, it's the speed (or lack thereof) with which it renders its 1:1 previews. And... you need those to check for sharpness, a rather essential criterion when you're separating the keepers from the rejects.

Speeding up your workflow with Photo Mechanic

That's why a lot of pro photographers have started to use Photo Mechanic, an extra piece of software, in their workflow. In the following video, I show you what Photo Mechanic can do as a 'front end' to Lightroom.

Photo Mechanic probably has only one drawback: its price tag of $150, although in itself not extravagant, seems to be a bit on the high side if you 'only' want to use it as a front-end to Lightroom...

The Big Deal Bundle

Well, I have some good news for you: if you like what you saw in the video, I would suggest NOT heading over to the Photo Mechanic website, but to the site of The Big Deal. This is a bundle consisting of over $3.000 worth of photography related software, ebooks, training videos, Lightroom presets, Photoshop actions and the like. The bundle is currently being offered for $99. And the best thing is... Photo Mechanic is included in The Big Deal. Not an old version or a time-delimited demo, but the real, fully workin, current version 5 (*). So, instead of forking out $150 for Photo Mechanic alone, you can get it at a 33% discount and in the mean time, download a very cool Joe McNally training vide on lighting, a compositing course by compositing guru Glyn Dewis, a tonne of Lightroom presets, some other cool software, including Clarity by Topaz Labs, Tonality by Macphun and much more.

Is this a permanent deal?

No, as with most of these bundles, there's a time-limit: you have to order before July 4th. So, if you're interested, head over to The Big Deal website and find out what else is included...

And don't forget, you'll not only be saving money but more importantly, you'll be saving precious time by culling your images with Photo Mechanic. And as time is money, you'll actually be saving money twice :-)

(*) Although the software itself is fully-functional, there are two things that I do want to tell you so you can make an informed decision: first of all, you can use this bundle version of Photo Mechanic on only one computer and second, the license is non-upgradeable. However, if you'll only be running it as a front-end to Lightroom in the way I describe in the video, the current version 5 has all it takes to do that, so you would not need an upgrade anytime soon anyway!

The Macphun Creative Kit XXL: over $2000 worth of software for only $129

If you're a Mac user, chances are that you've already heard of Macphun software. 

Macphun creates a number of interesting photo plug-ins for Lightroom and Photoshop. Their plugins can be purchased separately, but you can also get them in a bundle: the Creative Kit. For a limited time (until the end of May), Macphun has a special version of that Creative Kit, called the Creative Kit XXL, on sale. Basically, it's a bundle of the Creative Kit and a bunch of other photography related resources, such as eBooks, training videos, actions, textures and a bunch of Lightroom presets, including an unreleased set of my own!

When purchased separately, the total bundle would set you back over $2000 or €2000. Until the end of May, it's only $129 or €145 - the price difference between dollar and Euro is because of European VAT. In any case, it represents a savings of over 90 percent. And even if you aren't interested in all of the content, there's bound to be enough that interests you to make this killer deal worth your while.

I did the exercise and here's my personal top-10 of software and extras that are included in the bundle:

1.    Tonality CK

This Macphun Lightroom and Photoshop plug-in is one of the best plug-ins for creating great Black and White pictures. It comes loaded with presets for quick results but it caters to advanced users, too. One of the coolest features in my opinion is the fact that you can work with layers and layer masks inside of the plug-in. So, for example, you can combine the sky of one preset with the foreground of another. Or you can add a separate dodge & burn layer or a separate creative sharpening layer and work selectively in those layers.

Tonality is normally €60, but now it's included in the Macphun Creative Kit XXL.

Normal.dotm
0
0
1
43
248
MoreThanWords
2
1
304
12.0


0
false


18 pt
18 pt
0
0

false
false
false


 /* Style Definitions */
table.MsoNormalTable
	{mso-style-name:"Table Normal";
	mso-tstyle-rowband-size:0;
	mso-tstyle-c…

Converting this image from a bland to a powerful Black and White was a breeze with Tonality Pro. Thanks to the built-in layers and layer masks, it's easy to combine several looks into one or to add a dodge and burn layer for selectively brightening parts of the image, as I did here with the jacket. By the way, this is the Dutch interface. The App is obviously available in English, too!

2.    Intensify Pro

This is my second favorite Macphun plug-in: as its name implies, it lets you intensify your pictures. Think of it as Lightroom's Clarity slider on steroids. Intensify gives you incredible control over the texture, structure and sharpness in your images. 

Intensify is normally €60, but now it's included in the Macphun Creative Kit XXL.

All it took was one click on an Intensify preset to add more drama and mood to this image. And the sensor dust it brought out? That's an easy fix for Snapheal.

All it took was one click on an Intensify preset to add more drama and mood to this image. And the sensor dust it brought out? That's an easy fix for Snapheal.

3.    Snapheal

This third Macphun plug-in is great for removing unwanted elements like dust spots or power lines from your images. It's more powerful than Lightroom's Spot Removal tool and as such it's a great plug-in for Lightroom users that don't have Photoshop.

Snapheal is normally €50, but now it's included in the Macphun Creative Kit XXL.

4.    Africa with Athena. A photographic adventure.

A video-tutorial on shooting in South-Africa with award-winning photographer Athena Carey and filmed by talented Dutch photographer and filmer Armand Dijkstra (he's the guy that makes some of Joel Tjintjelaar's videos).

Normally € 68, now included in the Macphun Creative Kit XXL.

5.    Frank Doorhof's Live in Boston video.

The Dutch King of Fashion Photography and Training needs no further introduction! There's always something to learn from Frank. Normally €45, now included in the Macphun Creative Kit XXL.

6.    The Essentials of Street Photography eBook by James Maher.

An eBook on the increasingly popular genre of street photography. Normally €23, now included in the Macphun Creative Kit XXL.

7.    Getting Started with Portrait Retouching by Lesa Snider.

A tutorial video on portrait retouching. Normally €57, now included in the Macphun Creative Kit XXL.

8.    HDR with luminosity masks.

A video tutorial by Howard Snyder. Luminosity masks are a great way to have fine control over your images. If you're a landscape photographer, you have to know about them. Luminosity masking is one of the few things I leave Lightroom for and turn to Photoshop. Normally €68, now it's included in the Macphun Creative Kit XXL.

9.    Landscape eBook bundle by Nature Photo Guides.

If you're planning a trip to Iceland or Death Valley, these ebooks will help you get the most out of these places. Normally €57, now included in the Macphun Creative Kit XXL.

10. MoreThanWords Preset Mix Vol. 01.

Yes, that's right. I'm in the bundle, too. I've contributed a set of 20 Lightroom presets that aren't yet available elsewhere. If you like my Colorific Colour Grading Presets or my Black and White presets, you'll love these, too. Normally, they're €20, now ... you guessed it, they're included in the Macphun Creative Kit XXL. If you love Lightroom presets, there are hundreds more in the bundle, including the ones from Contrastly (by themselves another €112 value).

One click on the 'Warm Fuzzy Feeling' preset was all it took to transform this image. The preset bundle contains 20 presets: 10 color ones and 10 black & white ones.

One click on the 'Warm Fuzzy Feeling' preset was all it took to transform this image. The preset bundle contains 20 presets: 10 color ones and 10 black & white ones.

There's loads more than this top-ten, obviously and your top-ten may be different than mine. But a quick calculation taught me that this top-ten alone represents over a €500 value. And 330 of that €500 are extras, so that's not even counting the software. So the Creative Kit XXL might even tempt non-Mac users!

If you want to get the Creative Kit XXL, there's really only one downside: the deal is only valid through end of May 2016. So if you're thinking about it, don't think too long!

This is an overview of the all the extra goodies included in the Creative Kit XXL bundle, on top of the actual Macphun of the original Creative Kit, obviously.

This is an overview of the all the extra goodies included in the Creative Kit XXL bundle, on top of the actual Macphun of the original Creative Kit, obviously.


Review: Western Digital My Passport Ultra 3TB

As a photographer, you can never have enough storage space. Especially if you’re of the traveling kind and your laptop’s internal hard drive is limited.

I already reported about one of my favorite external drives for traveling, the WD My Passport Pro (review here).

Now a while back, WD introduced a new portable drive, the My Passport Ultra. There is also a Mac version of this drive, the My Passport for Mac. Except for the name, both are identical, it’s just that one is pre-formatted for Windows and the other is pre-formatted for Mac. The review copy WD sent me was an Ultra. As I use a Mac, I changed the formatting to HFS+. Easy enough.

75000 raw files on a pack of cigarettes

The My Passport Pro is available in four colours. If you use more than one (e.g. one for data and one for backup), choosing different colours can help you tell the drives apart. 

The My Passport Pro is available in four colours. If you use more than one (e.g. one for data and one for backup), choosing different colours can help you tell the drives apart. 

Compared to the My Passport Pro with its built in dual drives and raid system, the My Passport Ultra technically is a lot simpler: inside is a typical 2.5 inch laptop drive (you have a choice between 0.5, 1, 2 and 3 TB). At 5400 rpm, the drive itself is no faster or slower than the majority of other small external drives. The interface is USB 3 (backwards compatible with USB 2). What really sets this drive apart is its size and weight, or rather lack thereof: the 3TB version I tested weighs less than 250 grams (0.5 pounds) and at 21 x 81 x 110 mm (0.83 x 3.21 x 4.33 inches) it is not much bigger than a pack of cigarettes. At an average of 40 Mb per raw file, this means it can contain 75000 raw photos. Seventy Five Thousand! On a drive that fits in a shirt pocket! There won't be any more room for those cigarettes then, but they're bad for your health anyway. The beauty is that it’s USB powered, so no need to lug around a power supply that sometimes weighs more than the actual drive.

Possible uses

As you know from this post, I use a separate SSD drive to store my Lightroom catalog on. But SSD memory is far too expensive and limited to store your actual images on. And that's where this My Passport Ultra comes in. There are a couple of ways to include the Ultra in a portable Lightroom workflow:

  1. If you are a high volume shooter, you can use it exclusively for image storage. As I mentioned, if you calculate at an average of 40 MB for a raw file, the drive will contain up to 75.000 of them. If you shoot JPEG only, you can easily multiply that by 5. Just make sure you make regular backups to another drive. You don't want to lose 75.000 images in one go! You could get another My Passport Ultra, obviously, but you could also opt for a cheaper, bigger external hard drive with a separate power supply which would cost about half. You would then leave the bulky backup drive at home (or in your hotel room) and take the My Passport Ultra with you when you go out the door. Never leave your backup drive and the drive with your originals together in your hotel room!
  2. If you normally store your images on your internal harddrive, you could use the Ultra as a small and lightweight backup-only drive, although in that case, you probably don't need the 3 TB model!
  3. Personally, I make a hybrid use of the drive: as I'm really paranoid about losing my images, especially while traveling, I import them to my My Passport Pro, which is set up in Raid 1. That means if one of both drives in the My Passport Pro fails, I still have my pictures. However, Raid 1 does not protect me from theft or fire or other damage, and that's where the My Passport Ultra comes in: I've split it into two partitions. One, 1 TB in size acts as a Time Machine backup for my MacBook Pro's internal 1 TB drive. The other, 2 TB in size acts as a backup for the My Passport Pro. I've attached some velcro to the back of the My Passport Ultra (and to the back of my laptop case) so I can easily attach the drive to my laptop when I'm working. 
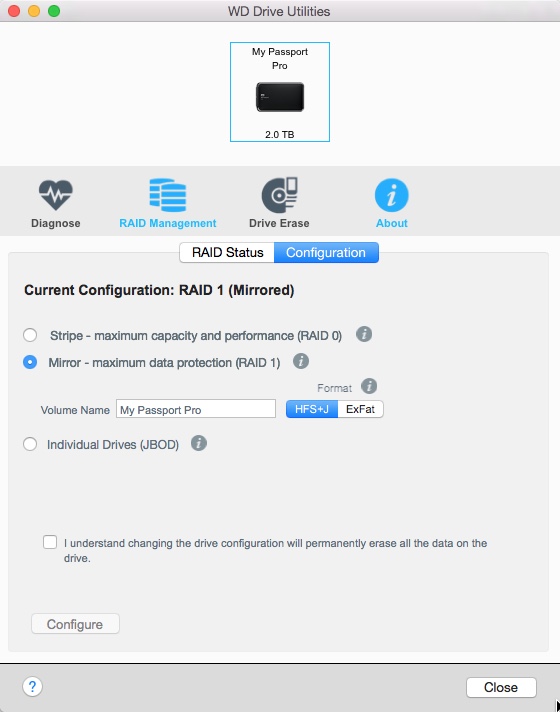
The My Passport Pro which I reviewed separately contains two drives. You can set these up in Raid 0 (they act like one big, faster drive but when one drive fails, all data is lost), Raid 1 (everything you write on one drive is automatically mirrored…

The My Passport Pro which I reviewed separately contains two drives. You can set these up in Raid 0 (they act like one big, faster drive but when one drive fails, all data is lost), Raid 1 (everything you write on one drive is automatically mirrored to the second) or JBOD (Just a Bunch of Disks) where they act as two different physical drives. The Pro has a Thunderbolt interface, which makes it more useful for Mac users than Windows users.

The above use cases are just examples. I'm sure you can come up with your own ideas on how to use 3 TB of storage! 

Price

This drive exists in a 0.5, 1, 2 and 3 TB version. Personally, I don't know who would buy the 0.5 TB version unless you're a photographer with lots of self-restraint. The 3 TB version costs around € 200 / $ 200. You do pay a premium for the small form factor, but I find the price to be very reasonable, especially given its extreme portability.

My Passport Pro or My Passport Ultra?

The Pro and the Ultra are different drives for different needs. For me, the main advantage of the My Passport Pro lies in the fact that it saves to two drives automatically, offering an initial and automated backup. However, having said that, you still need a secondary backup of the data that's on a My Passport Pro. After all, the drive can get lost or stolen, too.

If you don't mind making your own backups (on my Macs, I use Shirtpocket's SuperDuper), for the price of one My Passport Pro 2+2 TB, you can buy two My Passport Ultra 3 TB drives, giving you more flexibility and more storage.

Conclusion

I like the My Passport Ultra a lot. It's so small and lightweight that you can bring it with you wherever you go. The only disadvantage I could come up with is that the drive's housing isn't shock-resistant or weather-sealed, which would undoubtedly have added to the weight, size and... price! Other than that, if you’re looking for a lot of storage in a light small, convenient package, then look no further. Especially for laptop users this USB-powered drive combines convenience with ample storage without adding much bulk. Just as always, make sure to back up your data. No drive, regardless of the manufacturer, is failsafe. 


An advanced Smart Filter workflow with Alien Skin Exposure and Nik Software Viveza

If you follow this blog or if you've read some of my eBooks, you know I love working with plug-ins. For example, for film simulation I really like Alien Skin's Exposure. For local edits like dodging and burning, I like the Control Point technology found in Viveza by Nik Software. In this video, I'll show you a way to combine the best of both worlds, all while keeping your effects completely re-editable.

Now that is one cool workflow, isn't it? I actually forgot to mention yet another advantage of the Smart Filter workflow in the video: if you double-click on the icon in yellow (see screenshot below), you enter the Smart Filter's Blending Options. In that dialog box, you can not only change the Blending Mode for extra effect, but you can also reduce the Opacity to globally scale back the effect of the plug-in without having to dial back all of the individual sliders!

screenshotExposure.png

I hope you learned something from this 12 minute video. If you did, imagine what you could take away from 70+ hours of video tutorials (and over 10 eBooks, and hundreds of Lightroom presets): for only a couple of more days, you can take advantage of the 5 Day Deal, a unique bundle of photography training resources (including some 5 hours of video training by yours truly) that normally retails for over $3.300, but that can now be purchased for only $127! With 39 top-notch instructors like Zack Arias, David duChemin, Lindsay Adler and Joel Grimes and one über-geeky Belgian-with-a-strange-accent (that would be me) you're bound to learn a ton!

You can grab that bundle here and you're not only doing yourself and your photography a favour: 10 percent goes to charity. Last year's 5 Day Deal raised over $200.000 this way!

If you still need some convincing, check out yesterday's announcement post!

The new graduated filter brush in Lightroom 6/CC

I did a short video on a cool new Lightroom 6/CC feature that especially landscape photographers will love. But if you're more into shooting portraits, make sure to watch the video, too because the technique I describe works just as well with the Radial filter!

The Auto Mask feature I explain in the video works best if the area you're painting over is relatively similar in color and that colour is different enough from the background colour.

By the way, there's an even faster way to make custom graduated filters like this using Nik Software's Color Efex Pro. I explain all about that in this blog post which coincidentally features the same sample image!

If you want to know all about all of the other improvements in Lightroom 6/CC, you can check out my 100+ page 'Lightroom 6 up to Speed' eBook which is now also available as a bundle with my 300+ page 'Lightroom 5 Unmasked' eBook.


Review: Western Digital WD My Passport Pro for Mac. The ultimate portable harddrive for photographers?

Ever since I saw my buddy Matt Brandon from www.thedigitaltrekker.com use one on our Rajasthan photo workshop, I've been using a Western Digital WD My Passport Pro myself. The difference being that I opted for the 2 TB version. After over a year of using the drive, it's time for a review. Is it the ultimate hard drive for photographers? Well, although there's no such thing as perfection, it does come close!

What is it?

The WD My Passport Pro is an external hard drive specifically for Mac users: it uses a fast Thunderbolt connection. The drive draws it power from your computer, so no need to lug a power adapter along. Some may disagree, but I find the fact that the cable is attached a nice feature: when not in use, it wraps around the side of the drive. So, for someone as disorganised as me, it's a good thing I cannot loose the cable anymore. Unless I loose the entire drive, obviously...

Inside though is where things really start to get interesting: the WD My Passport Pro does not contain one but two classical rotating 2.5 inch 5400 RPM drives. Two 1 TB drives in the case of the My Passport Pro 2 TB and two 2 TB drives In the case of the bulkier 4 TB version. Speaking about size, here's how the two models differ:

Images courtesy WD

Images courtesy WD

What makes it special: three ways to configure it:

 
The WD Utilities software lets you set up the drive in three different ways. 'Mirror' is the one that I use and that offers the protection your images deserve.

The WD Utilities software lets you set up the drive in three different ways. 'Mirror' is the one that I use and that offers the protection your images deserve.


Using the supplied and easy to use WD software, this means you can set up the drive in any of three ways:

  1. JBOD (Just a Bunch of Disks): this means that the two drives inside the My Passport Pro will also show as two separate drives on your Mac. It's a bit like using two separate external drives, the difference being that they're conveniently stored in the same housing and there's only one cable. However, this is not the use I make of it nor is it the use I recommend making: there's cheaper and more efficient options for that, such as the newly announced My Passport Ultra, which exists in up to 3 TB of storage. 
    UPDATE: check out my friend Mike's workflow in the comments section: he does use the drive in JBOD mode and makes some valid arguments for that, too. And... he works in IT so he knows way more about this stuff than I do!
  2. Raid 0: this means that the two drives act like one big 2 or 4 TB drive (depending on the model). Especially for the latter, that's a lot of mobile storage! The risk however is that if one drive fails, all your data is gone because it's effectively spread across the two drives. So, unless you have an airtight backup system (which would mean you would have to backup to another WD My Passport Pro or a similar capacity drive) and, if you don't want to interrupt your workflow, also carry that backup with you, this is probably not the way you want to store your precious photographs.
  3. Which brings us to the third option (the one I use and is most recommended for photographers who, unlike Mike, aren't IT experts :-) : use the drive in Raid 1 mode. This means that the drive behaves as a 1 or 2 TB drive on your system and whatever you save on that drive is automatically mirrored on the second drive. If drive one fails, your data is still intact on the other and vice versa. As Mike rightly points out in the comments, this only protects you from drive failure, though. If you accidentally delete a file from one drive, it's automatically gone from the second, too... 

It's the latter option which makes the drive interesting for photographers who generally are paranoid (or should be) about losing their precious images. 

Scenario 1: using the drive as a temporary drive while traveling

I see two big scenarios in which this drive really shines: the first is as a travel drive to store your photographs (and other essential data) on while you're traveling. This means the setup would look something like this:

WDLaptop2.jpg

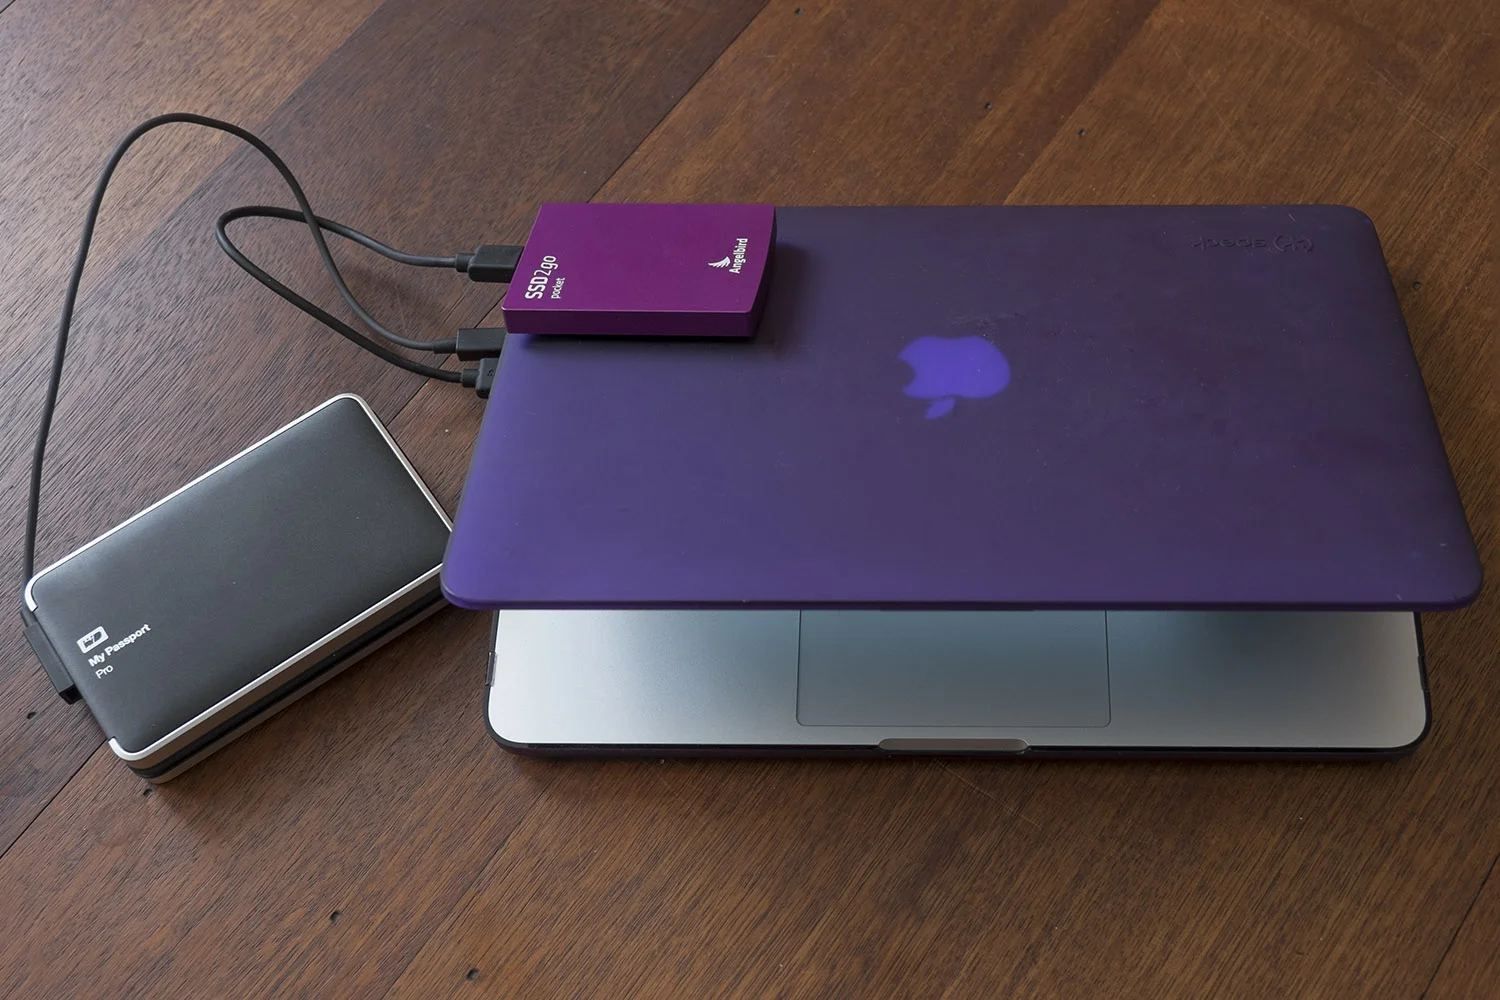
This is the scenario I follow when I'm traveling: using Lightroom, I'll import my images from the SD card to the My Passport Pro. My Catalog and Previews are on an external 512 GB Angelbird SSD drive. When Lightroom prompts me to back up the catalog when I quit it, I altnernate that backup between the internal drive of my laptop and the WD My Passport Pro. This adds an extra layer of security for my Catalog, as I will always have a fairly recent version in at least two extra locations. I only backup the catalog itself, by the way, not the previews, as they are too bulky and can always be re-rendered if necessary. 

If your Lightroom Catalog is not as big as mine (I have over 130.000 images in it), you could also put the Catalog, Previews and Smart Previews on the internal drive of your laptop or... on the My Passport Pro as well. Lightroom will just run slower because of the slower read and write speeds of this type of drive compared to solid state memory. Ultimately, you're the only judge of whether 'slower' still means 'fast enough' or 'too slow'. 

Especially if you're using a MacBook Air for traveling, due to its limited internal hard drive space, I'd recommend against putting the catalog and previews on the internal drive.

Additional security precautions while traveling

Having my images and a backup of my Lightroom catalog on the My Passport Pro protects me against drive failure, but it does not protect me against theft or loss of the drive, obviously. That's why I never reformat my memory cards while I'm traveling: memory cards are cheap so I just bring plenty of them. By not reformatting them, I have an extra, super light backup which I can easily take with me. I also make it a habit never to leave the My Passport Pro and my laptop unattended together (like in the hotel room): I will always carry one of them with me. That's also an advantage of the 2 TB version over the 4 TB version: it's slightly lighter and quite a lot smaller.

If the internet is fast enough wherever I'm traveling, I'll try to upload my best pictures of the trip (say the 5 star ones) to Dropbox as yet an extra layer of security.

When I'm back home, I will connect my catalog drive and the WD My Passport Pro to my desktop computer and - using Lightroom ! -I will  transfer the files over to my main storage system (currently a Drobo 5D Thunderbolt, although I have been investigating the options of NAS storage), freeing up room on the My Passport Pro for the next trip.

Scenario 2: using the drive as your only dedicated photo drive

For this workflow, I would recommend the 4 TB version because... you never can have enough storage, right? In this case, you just use the My Passport Pro as a convenient, small Raid device with the added benefit that should you ever want to take it with you, it's small and light enough to do so. 

This gives you 2 TB of mirrored hard drive space. In the case of my Fujifilm Raw files, which weigh about 30 MB per image, this means I could safely store some 66.000 images on the 4 TB version. That's a lot of images! If you're planning on organizing and storing more images than that, you're probably better of using a bigger, heavier (and more expensive) Raid System or NAS system. 

UPDATE: SCENARIO 3 - See Mike's comment for a possible third scenario I hadn't thought of myself.

Pricing

As you might expect from the feature list: these drives aren't cheap. If you're more of the DIY variety, you could get two separate drives and use separate backup software to do something similar. Personally, I prefer to avoid hassling with too much gear and software so I prefer to pay a premium for the portability and the convenience of the WD My Passport Pro. The 2 TB version will set you back some 289 € (that's at Dutch online retailer Bol.com) while the 4 TB version - if you're lucky enough to find a dealer that has them in stock - retails for about 432 €. As often is the case, it pays to surf around a bit and also, if you're reading this from the US, consider yourself lucky as prices are cheaper there.

The verdict

If you're a photographer using a Mac, the My Passport Pro is a very convenient tool to add an extra layer of security in your photography workflow, whether you're on the go or in your studio. The 2 TB version is very compact for its features and although not exactly shirt-pocketable, even the 4 TB version is still easily transportable. I've been using the 2 TB version for over a year now and other than one of the rubber feet getting MIA, which I replaced by a bit of Sugru, it has performed flawlessly! 

Highly recommended!

The WD My Passport Wireless is another drive that can be of interest to photographers, as it features a built-in SD Card Reader

The WD My Passport Wireless is another drive that can be of interest to photographers, as it features a built-in SD Card Reader

By the way, if you're mainly needing an external drive to back-up travel images to, Western Digital has given itself some internal competition in the form of the My Passport Wireless, which I will review on this blog shortly. Suffice to say for now that the built-in SD card reader of this particular drive should be enough to draw a photographer's attention.


Using the Angelbird 512 GB SSD2go pocket as a Catalog Drive with Lightroom

The Angelbird 512 GB SSD2go Pocket

The SSD2go pocket is one of the smallest, lightest external Solid State Drives there is.

The SSD2go pocket is one of the smallest, lightest external Solid State Drives there is.

During a recent tradeshow, I came across the people of Angelbird Technologies. Angelbird is an SSD storage developer and manufacturer.

So amongst other SSD solutions, they develop and manufacture external external Solid State Drives (SSDs). 

I was immediately struck by the simple and elegant design of their SSD2go pocket. When I suggested the drive might be an interesting option for photographers to store their Lightroom catalog on, I was offered to try one out. This drive is about as small as it gets for an external drive: it measures a mere 89.0 x 69.9 x 10.4 mm (3.5 x 2. 75 x 0.41 inch) and weighs only 90 grams without the cable. Speaking of which, I was happy to see that Angelbird uses a different kind of USB3 cable: one that looks like the old, standard USB2 cables. The main advantage is that this type of cable fits much tighter in the drive's and your computer's USB port. As I use this drive a lot plugged into my laptop when I'm running Lightroom, this diminishes the risk of me accidentally pulling out the drive's cable. Especially with the intended use of the drive as a Lightroom catalog drive, this is a big one, as (accidentally) disconnecting a catalog drive when Lightroom is still running can wreck all kinds of havoc, including catalog corruption! Not with this drive: I can actually have the drive dangle from my laptop and it still won't disconnect!

The USB3 cable has a much tighter fit than regular USB3 cables which adds an extra protection against accidental data loss or Lightroom catalog corruption, caused by inadvertently pulling the cable out of the USB port.

The USB3 cable has a much tighter fit than regular USB3 cables which adds an extra protection against accidental data loss or Lightroom catalog corruption, caused by inadvertently pulling the cable out of the USB port.

I won't bore you with the technical details (you can find those on the Angelbird website), but suffice to say that the drive is really fast: how does a Sustained Read Speed of up to 450 MB/s and a Sustained Write Speed of up to 390 MB/s sound? The Angelbird people seem to put a lot of attention to details: there's a five year warranty (still, don't forget to back up as no company will give you your data back), the unit comes with two cables and you can choose two lines of custom engraving to appear on the back of the drive. This is more than a gimmick: I put my website and telephone number on there, in case I ever lose the drive (with that minute size, something to consider!). For the fashion-conscious: you can choose between 4 colours. Again, this can be handy to easily tell drives apart. 

So, where does this drive fit in in a Lightroom workflow?

Working with two computers and an ECD (External Catalog Drive) 

Quite a number of photographers have two computers: a laptop and a desktop. As you might know, you can’t put your Lightroom Catalog on a network drive. Prior to Lightroom 5, if you kept your catalog on the internal drive of your desktop and you wanted to edit (part of ) your images on the laptop, you had to export those images as a catalog to an external drive, attach that drive to your laptop, open the exported catalog on your laptop, edit the images, and then reimport that changed catalog back into your main catalog on your desktop via File > Import from Another Catalog. If this sounds convoluted, well, it’s because it is; it’s definitely something for more advanced users and not something that you would want to do a couple times a day. 

The alternative used to be that you could put your catalog and also your images on one or more external drives and then attach those to the computer you wanted to work with. But large external drives aren’t easily transportable, nor are they meant to be! And they tend to be slower, too.

Smart Previews to the rescue!

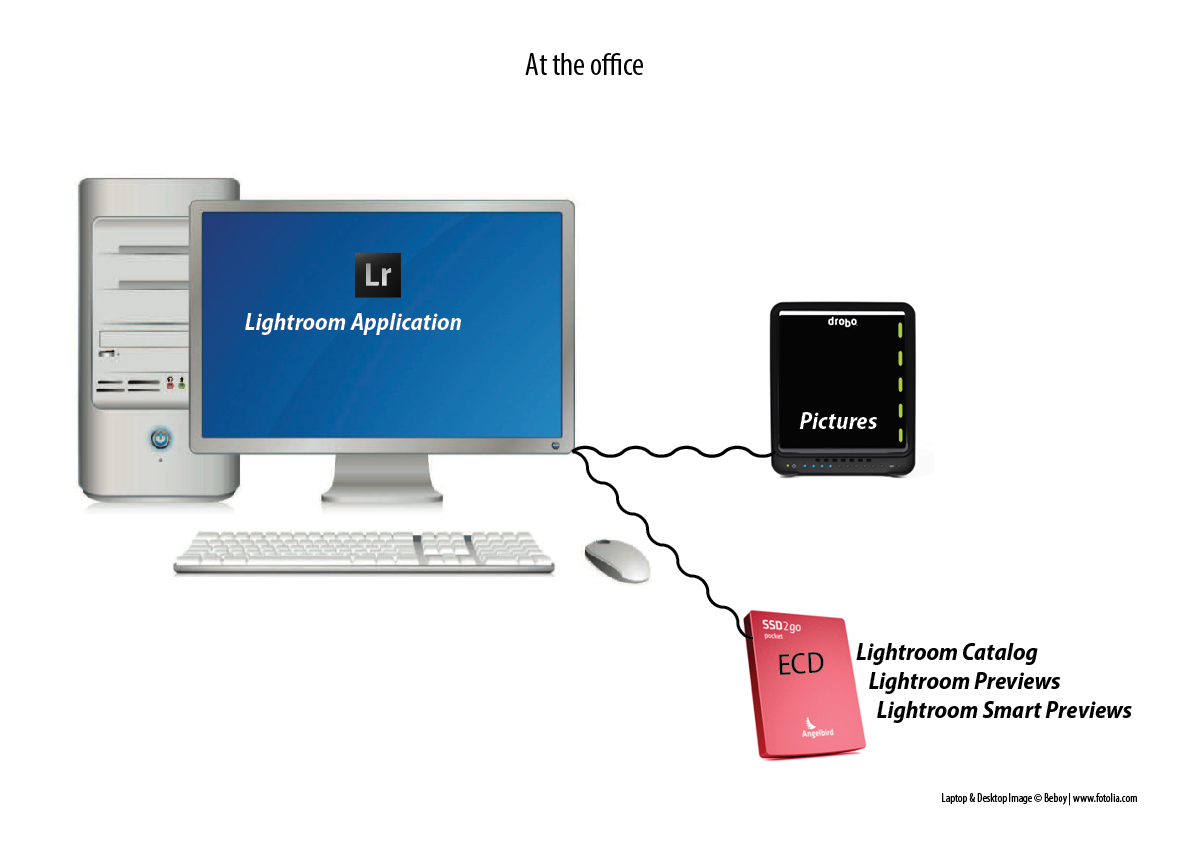
Smart Previews, introduced in Lightroom 5, offer a solution: the workflow consists of putting your catalog (and therefore the regular Previews and the Smart Previews) on a fast external drive (I call this the ECD for ‘External Catalog Drive) such as the Angelbird SSD2go pocket. The images themselves can then reside on the internal drive of your desktop computer, or on yet another external drive normally connected to that desktop computer. 

You then simply connect the ECD to the computer you want to work on at that moment. On your desktop computer, you will be working on the originals; on your laptop you will be working on the Smart Previews. 

In my personal workflow, my Lightroom catalog contains references to some 130,000 images. These are on a Drobo 5D where they take about 4 TB of hard drive space. The catalog, Previews and Smart Previews are on an external 512 GB SSD2go pocket. The S…

In my personal workflow, my Lightroom catalog contains references to some 130,000 images. These are on a Drobo 5D where they take about 4 TB of hard drive space. The catalog, Previews and Smart Previews are on an external 512 GB SSD2go pocket. The Smart Previews ‘weigh’ only about 100 GB. I can control the size of the ‘regular’ Previews (which are larger than the Smart Previews) via the options in the File Handling tab found under Lightroom > Catalog Settings (Mac) or Edit > Catalog Settings (Windows). 

When I want to work on my laptop, I will quit Lightroom on my desktop computer, disconnect the ECD, connect it to the laptop, start up Lightroom, open the catalog from the ECD and work on that. 

When I want to work on my laptop, I will quit Lightroom on my desktop computer, disconnect the ECD, connect it to the laptop, start up Lightroom, open the catalog from the ECD and work on that. 

When I’m finished working on the laptop, I will quit Lightroom, disconnect the ECD, reconnect to the desktop, start up Lightroom, open the catalog from the ECD, and all the edits I’ve made while working on my laptop will automatically be transferred…

When I’m finished working on the laptop, I will quit Lightroom, disconnect the ECD, reconnect to the desktop, start up Lightroom, open the catalog from the ECD, and all the edits I’ve made while working on my laptop will automatically be transferred to the high-resolution originals on my Drobo. 


POWER TIP: If you also put the Mac and Windows trial versions of Lightroom 5 (which you can download from the Adobe website) in a folder on your ECD, then you can literally open your catalog anywhere in the world, even if you don’t have your own computer on hand; just install the trial version on any (compatible) computer and you can get started!

Adding a 'Work in Progress' folder to the mix

If you have some spare space on your ECD, you can add a 'Work in Progress' folder: this is handy to store your latest images, or for example images you shoot while traveling. Once I no longer need the high resolution original raw files on the ECD, I…

If you have some spare space on your ECD, you can add a 'Work in Progress' folder: this is handy to store your latest images, or for example images you shoot while traveling. Once I no longer need the high resolution original raw files on the ECD, I simply move them - in Lightroom - to my Drobo, making room on the ECD for new 'work in progress' images.

Technically, my Lightroom Catalog and previews could fit on a 256 GB model, yet, I opted for the larger size for two reasons: it gives me some extra headroom for when my catalog grows (each extra file I import means I need to put about a 5 MB 1:1 preview and a 1.5 MB Smart Preview on the ECD) but it also allows me to put a 'Work in Progress' folder on the ECD: this is especially useful if you want to be able to edit files not only in Lightroom but also in Photoshop. Smart Previews can only be edited in Lightroom. So, I make it a habit to import recent files to a 'Work in Progress' folder on the Angelbird SSD2go pocket. This allows me to edit them in Photoshop or plug-ins, even when I'm on my laptop!

Catalog Backups

One thing to watch out for is your catalog backup: make sure that you’re even more rigorous than otherwise when it comes to making backups because external drives of course run a higher risk of getting lost or stolen, or—in the case of the classical, rotating drives—to fail. So, save your catalog backups on the internal drive of the desktop or laptop (or alternating between both) and verify in the back-up dialog window whether Lightroom is indeed backing up to the correct drive. Now that Lightroom 6 compresses your catalog backups, this extra security costs you even less in terms of storage space.

Isn't Dropbox an alternative?

An alternative to using an ECD would be to store your catalog (and the Previews and Smart Previews) on Dropbox. However, that not only requires a paid subscription (the free accounts are too small to store anything but a minute catalog) and moreover, it requires rigourous attention to waiting for your catalog to sync across your systems before opening it up on the other machine. Otherwise, you risk opening an outdated catalog and the longer it takes to realize that, the bigger mess you're in. Also, synching larger catalogs and previews can take quite a while. Therefore, the Dropbox route is one I don't personally use nor particularly recommend.

A little bit of Velcro goes a long way

I've added some Velcro to the back of my MacBook's protective cover and to the back of the SSD2go. This way I can use and move my laptop around without worrying about the drive falling.

I've added some Velcro to the back of my MacBook's protective cover and to the back of the SSD2go. This way I can use and move my laptop around without worrying about the drive falling.

Even though, as mentioned before, the Angelbird's USB cables fit firmly in the USB port, I still want to avoid unnecessary mishandling of that port. That's why I've added some velcro on the Angelbird's back as well as on my laptop's protective cover. They loose some of their design cool, but it's just easier to transport both through the house as I go from one room to another.

Conclusion

For anyone looking for a fast and hassle-free external drive to put their Lightroom catalog on so they can use it in a multi-computer setup, the Angelbird SSD2go pocket is a great choice. It exists in 3 sizes up to 512 GB. Because you only store the catalog itself, the previews and the smart previews, those capacities will get you a long way. Even if you don't need the full 512 GB right now, having some extra room could be handy because you can use it to store your 'Work in Progress' as well. Add to that the light weight, small size, lightning fast transfer speeds and great looks and it's easy to see why the Angelbird is now my favourite external catalog drive for Lightroom.

Angelbird's SSD2go pocket is available from the Angelbird website as well as a list of international retailers (the bespoke engraving is only available through their website). Prices start as low as 169 € for the 128 GB model.


This is an adapted excerpt from my Lightroom 5 Up to Speed + Lightroom 6 Unmasked eBook bundle. Between them, these two eBooks offer over 400 pages of solid Lightroom advice, tips and tricks and case studies. The bundle is available for a mere CAD $20 through www.craftandvision.com. (Scroll down from the product page to add the bundle to your cart instead of the individual eBooks).

Wirelessly tethering your camera into Lightroom with an Eyefi MobiPro SD Card

In a previous blog post, I did a review about the new Eyefi MobiPro SD Card. You might want to read that blog post first before watching this video. One of the conclusions was that for real-life tethered shooting (e.g. in a studio), wirelessly sending over raw files is just too slow (unless you're paid by the hour). So, in this follow-up article, I want to investigate an alternative workflow, which is a lot more efficient. Basically, I use this technique to wirelessly tether my 3 year old Fujifilm X-Pro 1 into Lightroom and it works like a charm! You can pretty much use this technique with most cameras that use SD cards.

The main workflow is as follows:

  1. Set your camera up to shoot raw + JPG
  2. Only transfer the JPG files wirelessly from the Eyefi card to your computer (that's the default Eyefi setup anyway)
  3. Use Lightroom's Auto-Import feature to import the wirelessly transferred JPG files into Lightroom
  4. Make any edits, add star ratings, keywords and pick or reject flags to the JPG files during your tethered shoot
  5. At the end of the shoot, copy the raw files over from the SD card to the same Lightroom folder the jpg files are in, 'the old fashioned way', i.e. manually using Lightroom's regular Import dialog
  6. (And this is the magical part) Have Lightroom automatically synchronise any edits (except for cropping) and metadata from the jpg files to the corresponding raw files, using John Beardsworth's Syncomatic plugin.

That's the short and sweet version. You can get the full lowdown in this video.